Difference between revisions of "Linux security"
From Gender and Tech Resources
m (→Initialising tripwire) |
m (→Using a firewall) |
||
| (26 intermediate revisions by 2 users not shown) | |||
| Line 4: | Line 4: | ||
== Setting up root mail == | == Setting up root mail == | ||
| − | |||
* Exim uses the Sendmail design model where a single binary controls all the facilities of the MTA. This monolithic design is inherently less secure due to the lack of binary separation between the individual components of the system. Exim separates processes and has well-defined stages where it gains or loses privileges. | * Exim uses the Sendmail design model where a single binary controls all the facilities of the MTA. This monolithic design is inherently less secure due to the lack of binary separation between the individual components of the system. Exim separates processes and has well-defined stages where it gains or loses privileges. | ||
* Postfix has a modular design to improve security over Qmail. A master daemon (a background process) launches other smaller processes with limited privileges that do specific tasks related to the various stages of mail delivery. The modular approach limits the effects of attacks. | * Postfix has a modular design to improve security over Qmail. A master daemon (a background process) launches other smaller processes with limited privileges that do specific tasks related to the various stages of mail delivery. The modular approach limits the effects of attacks. | ||
| Line 11: | Line 10: | ||
Debian with MATE comes with the <code>exim</code> mailserver installed. If you don't like <code>exim</code>, install <code>postfix</code> (if you install the one, the other is uninstalled). | Debian with MATE comes with the <code>exim</code> mailserver installed. If you don't like <code>exim</code>, install <code>postfix</code> (if you install the one, the other is uninstalled). | ||
| − | ==== Installing ==== | + | ==== Installing postfix ==== |
To install postfix: | To install postfix: | ||
| Line 20: | Line 19: | ||
==== icedove ==== | ==== icedove ==== | ||
| − | |||
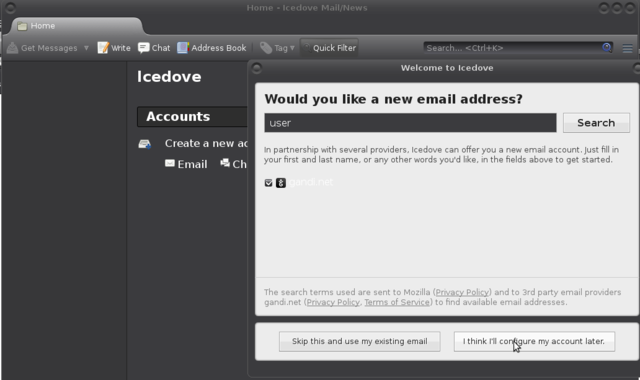
The wizard of icedove (thunderbird) does not allow directly for setting up local mail adresses. Choose "I think I'll configure my account later.": | The wizard of icedove (thunderbird) does not allow directly for setting up local mail adresses. Choose "I think I'll configure my account later.": | ||
| Line 68: | Line 66: | ||
For some "''aide'' vs ''tripwire''" notes, see [[Linux applications#Intrusion detection|Linux applications: Intrusion detection]], and for an example install of tripwire on a server, see [[Linux server security#Installing intrusion detection|Linux server security: Installing intrusion detection]]. | For some "''aide'' vs ''tripwire''" notes, see [[Linux applications#Intrusion detection|Linux applications: Intrusion detection]], and for an example install of tripwire on a server, see [[Linux server security#Installing intrusion detection|Linux server security: Installing intrusion detection]]. | ||
=== aide === | === aide === | ||
| − | |||
==== Installing aide ==== | ==== Installing aide ==== | ||
To install ''aide'' on a debian based system: | To install ''aide'' on a debian based system: | ||
| Line 81: | Line 78: | ||
==== Initialising aide ==== | ==== Initialising aide ==== | ||
| − | |||
Initialise (this can take some time): | Initialise (this can take some time): | ||
| Line 87: | Line 83: | ||
==== Configuring aide ==== | ==== Configuring aide ==== | ||
| − | |||
Most of ''aide'' configuration can be found in <code>/etc/aide/aide.conf</code>. This file is pretty well documented and default rules are quite decent. Aide aims at reporting files that changed since the last snapshot (stored in <code>/var/lib/aide/aide.db</code>). In hostile environments, a good security measure is to keep the database file on a floppy disk, cdrom or external disk. If you have such a device, you can copy the current snapshot to it and use the snapshot from that device during later runs of aide. | Most of ''aide'' configuration can be found in <code>/etc/aide/aide.conf</code>. This file is pretty well documented and default rules are quite decent. Aide aims at reporting files that changed since the last snapshot (stored in <code>/var/lib/aide/aide.db</code>). In hostile environments, a good security measure is to keep the database file on a floppy disk, cdrom or external disk. If you have such a device, you can copy the current snapshot to it and use the snapshot from that device during later runs of aide. | ||
| Line 110: | Line 105: | ||
=== tripwire === | === tripwire === | ||
| − | |||
==== Installing tripwire ==== | ==== Installing tripwire ==== | ||
| − | |||
To install <code>tripwire</code> on a debian-based system: | To install <code>tripwire</code> on a debian-based system: | ||
| Line 170: | Line 163: | ||
==== Configuring tripwire ==== | ==== Configuring tripwire ==== | ||
| − | |||
Just after install the tripwire directory <code>/etc/tripwire</code> contains a number of files, two of which are useful for its configuration. | Just after install the tripwire directory <code>/etc/tripwire</code> contains a number of files, two of which are useful for its configuration. | ||
| Line 181: | Line 173: | ||
$ sudo cp twcfg.txt twcfg.txt.old | $ sudo cp twcfg.txt twcfg.txt.old | ||
$ sudo cp twpol.txt twpol.txt.old</pre> | $ sudo cp twpol.txt twpol.txt.old</pre> | ||
| − | |||
| − | |||
| − | |||
| − | |||
| − | |||
| − | |||
| − | |||
| − | |||
| − | |||
| − | |||
| − | |||
| − | |||
| − | |||
| − | |||
| − | |||
| − | |||
| − | |||
| − | |||
| − | |||
| − | |||
| − | |||
| − | |||
| − | |||
| − | |||
| − | |||
| − | |||
| − | |||
| − | |||
| − | |||
| − | |||
| − | |||
| − | |||
==== Initialising tripwire ==== | ==== Initialising tripwire ==== | ||
| − | |||
Install default policy as root (mind the capital P, and know the cursor does not move at all when copy/pasting the passphrase (right-click works on the command-line for copy/pasting)): | Install default policy as root (mind the capital P, and know the cursor does not move at all when copy/pasting the passphrase (right-click works on the command-line for copy/pasting)): | ||
<pre># /usr/sbin/twadmin -m P /etc/tripwire/twpol.txt | <pre># /usr/sbin/twadmin -m P /etc/tripwire/twpol.txt | ||
Please enter your site passphrase: | Please enter your site passphrase: | ||
| − | Wrote policy file: /etc/tripwire/tw.pol | + | Wrote policy file: /etc/tripwire/tw.pol</pre> |
Still as root, generate the initial database (You will be asked for your local passphrase): | Still as root, generate the initial database (You will be asked for your local passphrase): | ||
| Line 294: | Line 253: | ||
The object: "/proc/sys/fs/binfmt_misc" is on a different file system...ignoring.</pre> | The object: "/proc/sys/fs/binfmt_misc" is on a different file system...ignoring.</pre> | ||
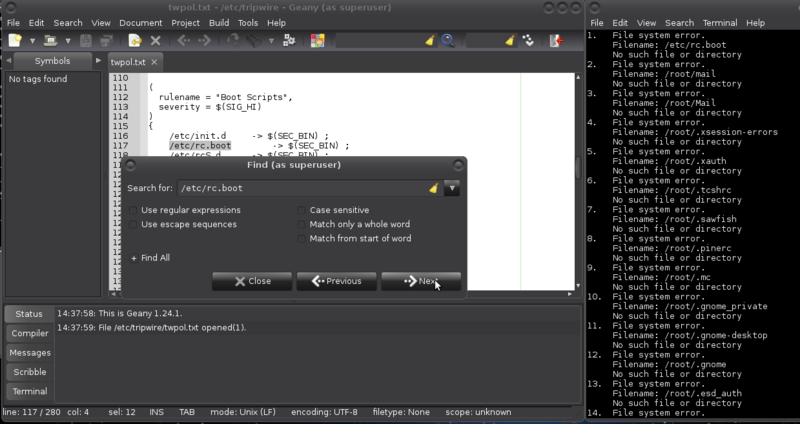
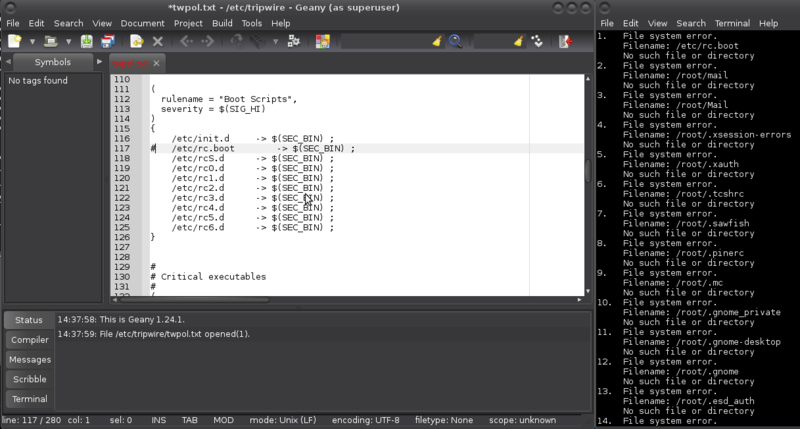
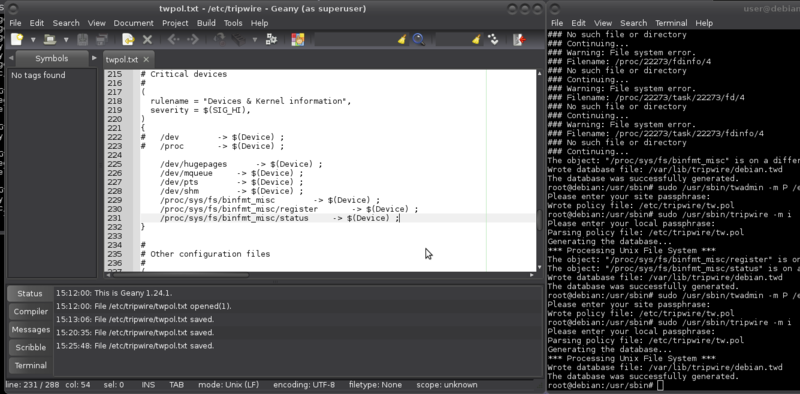
| − | Any <code>/dev</code> entries spell that the <code>/dev</code> file system also has other file systems mounted as <code>/dev/hugepages</code>, <code>/dev/mqueue</code>, <code>/dev/pts</code>, and <code>/dev/shm</code>. Similar objects in <code>proc</code> are also ignored. Directories in <code>/proc</code> change all the time and it is a pseudo-filesystem. My solution is to comment out both <code>/dev</code> and <code>/proc</code> and add the listed objects: | + | Any <code>/dev</code> entries spell that the <code>/dev</code> file system also has other file systems mounted as <code>/dev/hugepages</code>, <code>/dev/mqueue</code>, <code>/dev/pts</code>, and <code>/dev/shm</code>. Similar objects in <code>proc</code> are also ignored. Directories in <code>/proc</code> change all the time and it is a pseudo-filesystem. My solution is to comment out both <code>/dev</code> and <code>/proc</code> and add the listed objects that have appeared and that appear. |
| + | |||
| + | <pre>The object: "/proc/sys/fs/binfmt_misc/register" is on a different file system...ignoring. | ||
| + | The object: "/proc/sys/fs/binfmt_misc/status" is on a different file system...ignoring.</pre> | ||
| + | |||
| + | <code>binfmt_misc</code> is a capability of the Linux kernel which allows arbitrary executable file formats to be recognised and passed to certain user space applications, such as emulators and virtual machines. The executable formats are registered through a special purpose file system interface (similar to <code>/proc</code>). Debian-based distributions provide the functionality through an extra binfmt-support package. Needs monitoring. So, added those two as well. | ||
[[File:Tripwire14.png|800px|thumb|center]] | [[File:Tripwire14.png|800px|thumb|center]] | ||
| Line 300: | Line 264: | ||
After that you need to re-install default policy and generate the database again. | After that you need to re-install default policy and generate the database again. | ||
| − | == | + | ==== Cleaning up ==== |
| + | It is now safe to delete the clear text versions of the tripwire policy and configuration files: | ||
| + | # rm /etc/tripwire/twcfg.txt /etc/tripwire/twpol.txt | ||
| + | |||
| + | If they need to be restored, cleartext versions of these files can be created from the by tripwire encrypted versions (lowercase p): | ||
| + | |||
| + | # usr/sbin/twadmin -m p > /etc/tripwire/twpol.txt | ||
| + | |||
| + | ==== Using tripwire ==== | ||
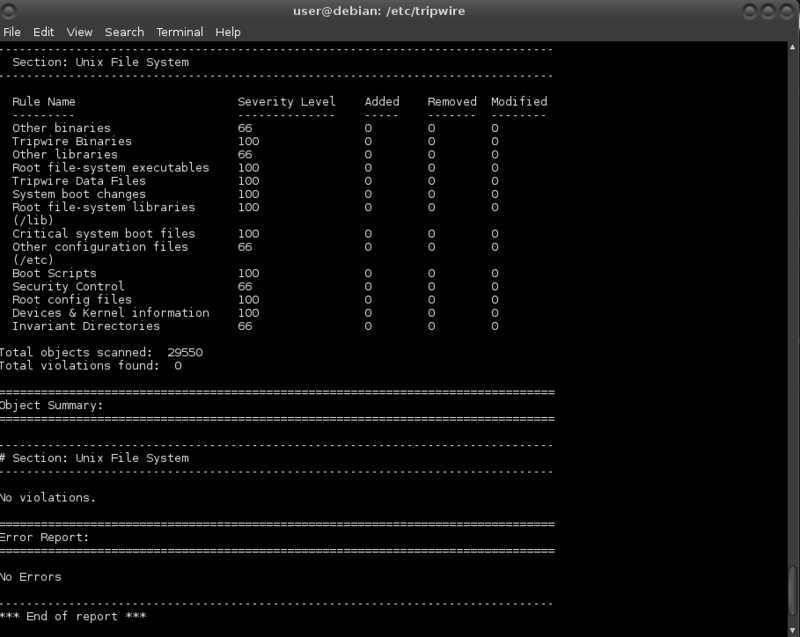
| + | $ sudo /usr/sbin/tripwire -m c | ||
| + | |||
| + | [[File:Tripwire15.png|800px|thumb|center]] | ||
| + | |||
| + | The management at a directory level also means that addition of packages to a system will almost certainly require the updating or regeneration of the tripwire database. | ||
| + | ==== External drive ==== | ||
| + | If you wish to use an external drive for holding the binaries and/or database, on the external drive create a directory tripwire to hold both the tripwire binary in <code>/usr/bin/</code> and databases in <code>/var/lib/tripwire</code> so that if and when your system is compromised and the drive is mounted, the intruder would need root to change the files (-rwxr-xr-x). Also create an <code>/etc/tripwire</code> directory for file manipulation on the drive. | ||
| + | |||
| + | This setup has several problems. Even with the paths set to the drive directories and files, when running tripwire from the drive the resulting report is put in the <code>/var/lib/tripwire</code> directory on the local machine (not on the drive), and when re-initialising the database the database is also put in the directory on the local machine. Plus that running tripwire from the drive expects the database in <code>/var/lib/tripwire</code> on the local machine. Rather than hacking the code, I used a workaround and added two little zero version scripts to my [[shell scripting]] wardrobe, one for running tripwire from the drive and another one for updating the tripwire policy database. | ||
| + | The binaries to copy from <code>/usr/sbin</code> are: | ||
| + | |||
| + | * tripwire: The main file; used for initialising the database, checking the integrity of the file system, updating the database and updating the policy. | ||
| + | * twadmin: tripwire’s administrative and utility tool; used for creating and printing configuration files, replacing and printing a policy file, generating site and local keys and other encryption related functions. | ||
| + | * twprint: Used to print the reports and database in human-readable format. | ||
| + | * siggen: Generates the various hashes that tripwire supports for checking the integrity of files. | ||
| + | |||
| + | With drive being the name of your drive as root (<code>sudo -s</code>): | ||
| + | |||
| + | # cp -R /var/lib/tripwire /media/user/drive/tripwire/var/lib/ | ||
| + | |||
| + | and copy the binaries tripwire, twadmin, siggen and twprint: | ||
| + | |||
| + | <pre># cp /usr/sbin/tripwire /media/user/drive/tripwire/usr/sbin/ | ||
| + | # cp /usr/sbin/twadmin /media/user/drive/tripwire/usr/sbin/ | ||
| + | # cp /usr/sbin/siggen /media/user/drive/tripwire/usr/sbin/ | ||
| + | # cp /usr/sbin/twprint /media/user/drive/tripwire/usr/sbin/</pre> | ||
| + | |||
| + | Change <code>DBFILE</code> and <code>REPORTFILE</code> with your preferred text editor in <code>/etc/tripwire/twcfg.txt</code> to reflect the location on your external drive: | ||
| + | |||
| + | # geany /etc/tripwire/twcfg.txt | ||
| + | |||
| + | And in <code>twpol.txt</code> change <code>TWBIN</code> and <code>TWVAR</code> to reflect their locations on the external drive: | ||
| + | |||
| + | # geany /etc/tripwire/twpol.txt | ||
| + | |||
| + | == Installing rootkit scanners == | ||
A rootkit is a collection of tools a hacker installs on a victim's computer after gaining initial access. It generally consists of network sniffers, log-cleaning scripts, and trojaned replacements of core system utilities such as <code>ps</code>, <code>netstat</code>, <code>ifconfig</code>, and <code>killall</code>. Most times they are self-hiding toolkits to avoid the eye of the sysadmin. Applications that are used to detect rootkits are known as rootkit scanners. There are two rootkit scanners that are important to have on your linux box: <code>rkhunter</code> and <code>chkrootkit</code>. Both. They may not stop a sophisticated adversary, they do help us see mistakes we make. | A rootkit is a collection of tools a hacker installs on a victim's computer after gaining initial access. It generally consists of network sniffers, log-cleaning scripts, and trojaned replacements of core system utilities such as <code>ps</code>, <code>netstat</code>, <code>ifconfig</code>, and <code>killall</code>. Most times they are self-hiding toolkits to avoid the eye of the sysadmin. Applications that are used to detect rootkits are known as rootkit scanners. There are two rootkit scanners that are important to have on your linux box: <code>rkhunter</code> and <code>chkrootkit</code>. Both. They may not stop a sophisticated adversary, they do help us see mistakes we make. | ||
=== rkhunter === | === rkhunter === | ||
| − | |||
Rootkit Hunter (<code>rkhunter</code>) is a shell script to detect known rootkits or malware. It also performs checks to see if commands have been modified, and various checks on the network interfaces, including checks for listening applications. | Rootkit Hunter (<code>rkhunter</code>) is a shell script to detect known rootkits or malware. It also performs checks to see if commands have been modified, and various checks on the network interfaces, including checks for listening applications. | ||
==== Installing rkhunter ==== | ==== Installing rkhunter ==== | ||
| − | |||
You can install it from the Software Center or synaptic, or from the commandline: | You can install it from the Software Center or synaptic, or from the commandline: | ||
| Line 330: | Line 336: | ||
==== Updating database ==== | ==== Updating database ==== | ||
| − | |||
Update the rkhunter database: | Update the rkhunter database: | ||
| Line 340: | Line 345: | ||
==== Baselining rkhunter ==== | ==== Baselining rkhunter ==== | ||
| − | |||
Set baseline file properties by checking the current values and storing them as known-good values: | Set baseline file properties by checking the current values and storing them as known-good values: | ||
| Line 413: | Line 417: | ||
==== unhide ==== | ==== unhide ==== | ||
| − | |||
ACTUALLY, nearly all green and two purple: | ACTUALLY, nearly all green and two purple: | ||
| Line 438: | Line 441: | ||
=== chkrootkit === | === chkrootkit === | ||
| − | |||
<code>chkrootkit</code> is a shell script that checks system binaries for rootkit modification. | <code>chkrootkit</code> is a shell script that checks system binaries for rootkit modification. | ||
==== Installing chkrootkit ==== | ==== Installing chkrootkit ==== | ||
| − | |||
To install chkrootkit: | To install chkrootkit: | ||
$ sudo apt-get install chkrootkit | $ sudo apt-get install chkrootkit | ||
| Line 457: | Line 458: | ||
$ sudo chkrootkit | $ sudo chkrootkit | ||
| − | + | And you may get something like: | |
| + | <pre>Checking `chkutmp'... The tty of the following user process(es) were not found in /var/run/utmp ! | ||
| + | ! RUID PID TTY CMD | ||
| + | ! root 897 tty7 /usr/bin/X :0 -seat seat0 -auth /var/run/lightdm/root/:0 -nolisten tcp vt7 -novtswitch | ||
| + | chkutmp: nothing deleted | ||
| + | </pre> | ||
| + | The <code>man utmp</code> reads: | ||
| + | ''The utmp file allows one to discover information about who is currently using the system. There may be more users currently using the system, because not all programs use utmp logging.'' | ||
| + | |||
| + | ''Warning: utmp must not be writable, because many system programs (foolishly) depend on its integrity. You risk faked system logfiles and modifications of system files if you leave utmp writable to any user.'' | ||
| + | |||
| + | These messages are always worth checking out because chkrootkit compares all the user processes running in the system with what is registered in <code>/var/run/utmp</code>, reporting the fact that this particular process run by root is not registered (is hidden). It doesn't mean your system has cooties (rootkits or loggers), but it might. | ||
| + | |||
| + | In this case it is not the cooties, but xorg listening for remote desktop connection requests. :D I have tried turning it off. Not a good idea. | ||
| + | |||
| + | You may also get: | ||
| + | |||
| + | <pre>Searching for suspicious files and dirs, it may take a while... The following suspicious files and directories were found: | ||
| + | /usr/lib/icedove/.autoreg /usr/lib/pymodules/python2.7/.path /usr/lib/jvm/.java-1.7.0-openjdk-amd64.jinfo</pre> | ||
| + | |||
| + | These are false positives: https://bugs.debian.org/cgi-bin/bugreport.cgi?bug=789052 | ||
| + | |||
| + | == Managing passwords == | ||
Using a password manager allows you to load passwords in your clipboard, making it hard to catch it with a keylogger (just in case). And all good password managers allow you to generate passwords, making the passwords independent from your personal preferences and harder to crack. One of the easiest password managers is a GUI tool called keepassx: | Using a password manager allows you to load passwords in your clipboard, making it hard to catch it with a keylogger (just in case). And all good password managers allow you to generate passwords, making the passwords independent from your personal preferences and harder to crack. One of the easiest password managers is a GUI tool called keepassx: | ||
| Line 475: | Line 498: | ||
== Blacklisting modules == | == Blacklisting modules == | ||
| − | |||
=== Camera === | === Camera === | ||
| Line 521: | Line 543: | ||
=== Microphone === | === Microphone === | ||
| − | |||
Open the alsa control panel for muting the microphone: | Open the alsa control panel for muting the microphone: | ||
| Line 528: | Line 549: | ||
You can also use the same <code>modprobe</code> enabling/disabling method as used above for webcam. This page may be helpful for finding your driver module: http://alsa.opensrc.org/ALSA_modules. | You can also use the same <code>modprobe</code> enabling/disabling method as used above for webcam. This page may be helpful for finding your driver module: http://alsa.opensrc.org/ALSA_modules. | ||
=== Firewire and thunderbolt === | === Firewire and thunderbolt === | ||
| − | A ''d''irect ''m''emory ''a''ccess (DMA) attack is a type of side channel attack in which an adversary penetrates a device by exploiting the presence of high-speed expansion ports that permit Direct Memory Access. Firewire, thunderbolt and ExpressCard allow (by design) any connecting device full direct memory access to your system. They can be disabled in /etc/modprobe.d/blacklist-dma.conf: | + | A '''d'''irect '''m'''emory '''a'''ccess (DMA) attack is a type of side channel attack in which an adversary penetrates a device by exploiting the presence of high-speed expansion ports that permit Direct Memory Access. Firewire, thunderbolt and ExpressCard allow (by design) any connecting device full direct memory access to your system. They can be disabled in /etc/modprobe.d/blacklist-dma.conf: |
<pre>blacklist firewire-core | <pre>blacklist firewire-core | ||
| Line 543: | Line 564: | ||
* Redirect ports to the hosts providing the service (NAT). | * Redirect ports to the hosts providing the service (NAT). | ||
| − | If | + | If this is for a personal machine at home, only the first two are of interest. These are also the two that are most likely to cause issues for a beginning user. |
=== ufw and gufw === | === ufw and gufw === | ||
| − | |||
==== Enabling ==== | ==== Enabling ==== | ||
Mint and ubuntu come with a firewall installed, but it is disabled. Usually it's better to turn it on. Especially on mobile devices like laptops, which sometimes connect to other networks than your own. | Mint and ubuntu come with a firewall installed, but it is disabled. Usually it's better to turn it on. Especially on mobile devices like laptops, which sometimes connect to other networks than your own. | ||
| Line 567: | Line 587: | ||
And it'll be in your menu items (the icon in mint is a brick wall). | And it'll be in your menu items (the icon in mint is a brick wall). | ||
| − | ==== Making the rules ==== | + | ==== Making the rules (ufw) ==== |
| − | + | ||
Found a pretty good no-nonsense tutorial here https://help.ubuntu.com/community/UFW | Found a pretty good no-nonsense tutorial here https://help.ubuntu.com/community/UFW | ||
| Line 590: | Line 609: | ||
=== iptables and netfilter === | === iptables and netfilter === | ||
| − | + | ==== Installing persistence ==== | |
| − | ==== Installing ==== | + | |
| − | + | ||
<code>iptables</code> is installed by default. For rules to be persistent (automatically loaded) so they work after reboot, install <code>iptables-persistent</code>. It relies on <code>netfilter-persistent</code>: | <code>iptables</code> is installed by default. For rules to be persistent (automatically loaded) so they work after reboot, install <code>iptables-persistent</code>. It relies on <code>netfilter-persistent</code>: | ||
| Line 611: | Line 628: | ||
==== Configuring iptables ==== | ==== Configuring iptables ==== | ||
| − | |||
To set it to deny everything except the bare minimum requirements that you need on your system(s) and only accept connections that have been explicitly allowed in the rules: | To set it to deny everything except the bare minimum requirements that you need on your system(s) and only accept connections that have been explicitly allowed in the rules: | ||
| Line 640: | Line 656: | ||
==== Configuring ip6tables ==== | ==== Configuring ip6tables ==== | ||
| − | |||
The rules for IPv6 are similar: | The rules for IPv6 are similar: | ||
| Line 662: | Line 677: | ||
<pre># ip6tables -A INPUT -j DROP</pre> | <pre># ip6tables -A INPUT -j DROP</pre> | ||
| − | ==== Making the rules ==== | + | ==== Making the rules (iptables) ==== |
| − | + | ||
For a readable tutorial on the basics see ''The Beginner’s Guide to iptables, the Linux Firewall'' http://www.howtogeek.com/177621/the-beginners-guide-to-iptables-the-linux-firewall or the IP Tables Primer http://bodhizazen.net/Tutorials/iptables/ | For a readable tutorial on the basics see ''The Beginner’s Guide to iptables, the Linux Firewall'' http://www.howtogeek.com/177621/the-beginners-guide-to-iptables-the-linux-firewall or the IP Tables Primer http://bodhizazen.net/Tutorials/iptables/ | ||
| Line 687: | Line 701: | ||
== Safer browsing == | == Safer browsing == | ||
| − | |||
It is clear that browsing has the most low cost attack vectors for data theft by hackers, tracking by corporations and for governmental spying. Safer browsing is a good investment all around. | It is clear that browsing has the most low cost attack vectors for data theft by hackers, tracking by corporations and for governmental spying. Safer browsing is a good investment all around. | ||
| Line 693: | Line 706: | ||
=== Settings === | === Settings === | ||
| − | |||
For disabling flash: | For disabling flash: | ||
| Line 711: | Line 723: | ||
HTTP Switchboard is a scriptblocker AND an adblocker. It is no longer developed. The project has split into two distinct, more advanced extensions: uBlock Origin and uMatrix. | HTTP Switchboard is a scriptblocker AND an adblocker. It is no longer developed. The project has split into two distinct, more advanced extensions: uBlock Origin and uMatrix. | ||
| − | ==== | + | ==== Ad blockers ==== |
| + | Ghostery looks for third-party "trackers" on web pages. These can be social network widgets, advertisements, invisible pixels used for tracking and analytics, etc. It notifies of presence and companies operating the trackers and allows for blocking the trackers. | ||
| + | BUT how do they make money? Ghostery sells the tracking data that users (who volunteer for this) gather from sites they visit. Ghostery Inc. then sells this data to the companies that run the sites <ref>A Popular Ad Blocker Also Helps the Ad Industry http://www.technologyreview.com/news/516156/a-popular-ad-blocker-also-helps-the-ad-industry/</ref>. | ||
| + | ==== Restricting access to browsing history ==== | ||
SafeHistory restricts the marking of visited links on the basis of the originating document, defending against web privacy attacks that remote sites can use to determine your browser history at other sites https://addons.mozilla.org/en-US/firefox/addon/safehistory/ (and cannot be installed in up-to-date iceweasels anymore) | SafeHistory restricts the marking of visited links on the basis of the originating document, defending against web privacy attacks that remote sites can use to determine your browser history at other sites https://addons.mozilla.org/en-US/firefox/addon/safehistory/ (and cannot be installed in up-to-date iceweasels anymore) | ||
| Line 734: | Line 749: | ||
<pre># apt-get update | <pre># apt-get update | ||
# apt-get install ntfs-3g</pre> | # apt-get install ntfs-3g</pre> | ||
| − | |||
| − | |||
== Encryption == | == Encryption == | ||
| + | But the most popular forms of security all rely on encryption, the process of encoding information in such a way that only the person (or computer) with the key can decode it. Or maybe others can for some forms of encryption. Or can soon? | ||
For an overview of encryption concepts see [[encrypting everything]] and for application of concepts in useful tools, see [[object encryption on linux]] and [[anonymising your traffic with linux]]. | For an overview of encryption concepts see [[encrypting everything]] and for application of concepts in useful tools, see [[object encryption on linux]] and [[anonymising your traffic with linux]]. | ||
== Making backups == | == Making backups == | ||
| − | |||
Data backups were traditionally done by commands to archive and compress files to backup, then writing that backup archive to tape. Tape archiving has been replaced by backing up data over the network, to other hard disks, CD's, DVD's and other low-cost removable media. | Data backups were traditionally done by commands to archive and compress files to backup, then writing that backup archive to tape. Tape archiving has been replaced by backing up data over the network, to other hard disks, CD's, DVD's and other low-cost removable media. | ||
=== Archiving and compressing === | === Archiving and compressing === | ||
| − | |||
Linux offers separate tools for gathering groups of files into a single archive and compressing that archive for efficient storage. Oh yuk, "efficient", oh well. It's about using less disk space and reducing transfer times over networks. And comes at a price. It can increase your CPU usage. | Linux offers separate tools for gathering groups of files into a single archive and compressing that archive for efficient storage. Oh yuk, "efficient", oh well. It's about using less disk space and reducing transfer times over networks. And comes at a price. It can increase your CPU usage. | ||
==== tar ==== | ==== tar ==== | ||
| Line 766: | Line 778: | ||
==== gzip ==== | ==== gzip ==== | ||
| − | |||
Gzip compress the size of the given files using Lempel-Ziv coding (LZ77). Whenever possible, each file is replaced by one with the extension .gz. For more on how it works, see https://en.wikipedia.org/wiki/DEFLATE | Gzip compress the size of the given files using Lempel-Ziv coding (LZ77). Whenever possible, each file is replaced by one with the extension .gz. For more on how it works, see https://en.wikipedia.org/wiki/DEFLATE | ||
| Line 791: | Line 802: | ||
==== bzip2 ==== | ==== bzip2 ==== | ||
| − | |||
<code>bzip2</code> compresses files using the Burrows-Wheeler block sorting text compression algorithm and Huffman coding. Compression is generally considerably better than that achieved by bzip command (LZ77/LZ78-based compressors). Whenever possible, each file is replaced by one with the extension <code>.bz2</code>. | <code>bzip2</code> compresses files using the Burrows-Wheeler block sorting text compression algorithm and Huffman coding. Compression is generally considerably better than that achieved by bzip command (LZ77/LZ78-based compressors). Whenever possible, each file is replaced by one with the extension <code>.bz2</code>. | ||
| Line 801: | Line 811: | ||
==== lzop ==== | ==== lzop ==== | ||
| − | |||
<code>lzop</code> uses the LZO data compression library for compression services, and its main advantages over gzip are much higher compression and decompression speed (at the cost of some compression ratio). <code>lzop</code> is copyrighted under the terms of the GNU General Public License (GPL). More on http://www.lzop.org/ | <code>lzop</code> uses the LZO data compression library for compression services, and its main advantages over gzip are much higher compression and decompression speed (at the cost of some compression ratio). <code>lzop</code> is copyrighted under the terms of the GNU General Public License (GPL). More on http://www.lzop.org/ | ||
| Line 817: | Line 826: | ||
=== Backing up files === | === Backing up files === | ||
| − | |||
Data backup is something that everybody should do, but unfortunately, few people do it on a regular basis. You can make a backup of your entire system with rsync or with unison. | Data backup is something that everybody should do, but unfortunately, few people do it on a regular basis. You can make a backup of your entire system with rsync or with unison. | ||
==== rsync ==== | ==== rsync ==== | ||
| − | |||
<code>rsync</code> ('''r'''emote '''sync'''), is a remote and local file synchronisation tool. It uses an algorithm that minimises the amount of data copied by only moving the portions of files that have changed. It operates in a way similar to <code>ssh</code>, <code>scp</code>, and <code>cp</code>, for example: | <code>rsync</code> ('''r'''emote '''sync'''), is a remote and local file synchronisation tool. It uses an algorithm that minimises the amount of data copied by only moving the portions of files that have changed. It operates in a way similar to <code>ssh</code>, <code>scp</code>, and <code>cp</code>, for example: | ||
| Line 829: | Line 836: | ||
==== unison ==== | ==== unison ==== | ||
| − | |||
<code>unison</code> allows for accessing the same set of files from any computer (running Mac OS X, M$ Windows XP, or UNIX/Linux) and keeps these files up-to-date by always maintaining the most recently-modified version of each file during synchronization. The great benefit of using <code>unison</code> to replicate files across different computers (servers) is that your backups are alive http://www.cis.upenn.edu/~bcpierce/unison/. | <code>unison</code> allows for accessing the same set of files from any computer (running Mac OS X, M$ Windows XP, or UNIX/Linux) and keeps these files up-to-date by always maintaining the most recently-modified version of each file during synchronization. The great benefit of using <code>unison</code> to replicate files across different computers (servers) is that your backups are alive http://www.cis.upenn.edu/~bcpierce/unison/. | ||
== Traffic monitoring == | == Traffic monitoring == | ||
| − | |||
=== wireshark === | === wireshark === | ||
| − | |||
Wireshark lets you capture and interactively browse the traffic running on a computer network and can be used to debug network protocol implementations, examine security problems and inspect network protocol internals. See [[networking concepts]]. | Wireshark lets you capture and interactively browse the traffic running on a computer network and can be used to debug network protocol implementations, examine security problems and inspect network protocol internals. See [[networking concepts]]. | ||
| − | ==== Installing ==== | + | ==== Installing wireshark ==== |
$ sudo apt-get install wireshark | $ sudo apt-get install wireshark | ||
| Line 850: | Line 854: | ||
==== Capturing packets ==== | ==== Capturing packets ==== | ||
| − | |||
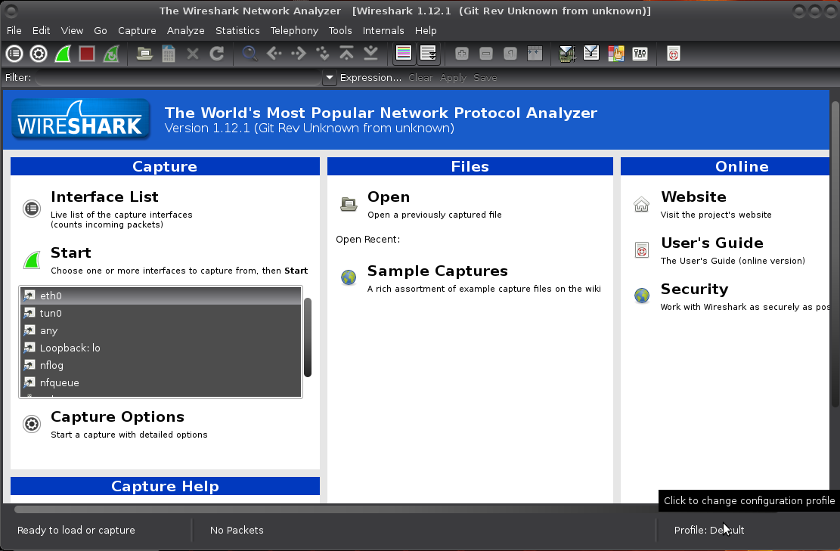
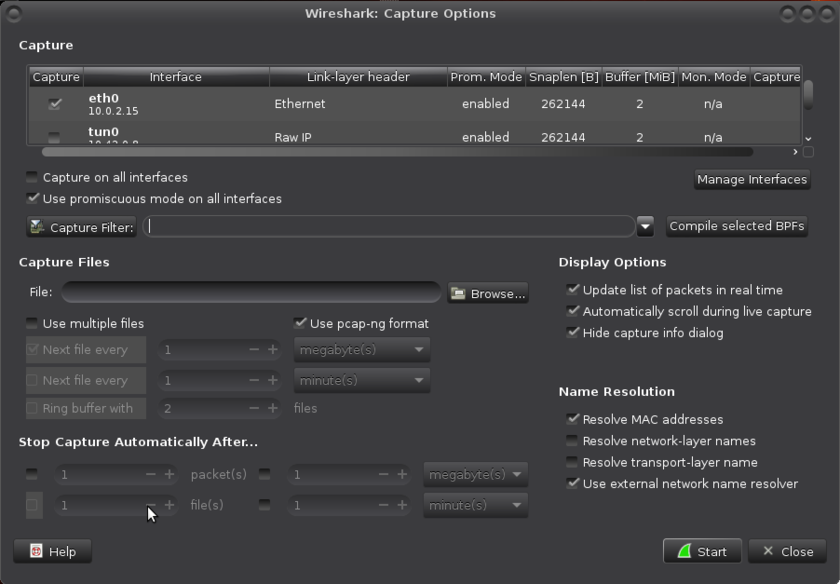
You can launch it and click the name of an interface under ''Interface List'' to start capturing packets on that interface: | You can launch it and click the name of an interface under ''Interface List'' to start capturing packets on that interface: | ||
| Line 868: | Line 871: | ||
==== Filtering packets ==== | ==== Filtering packets ==== | ||
| − | |||
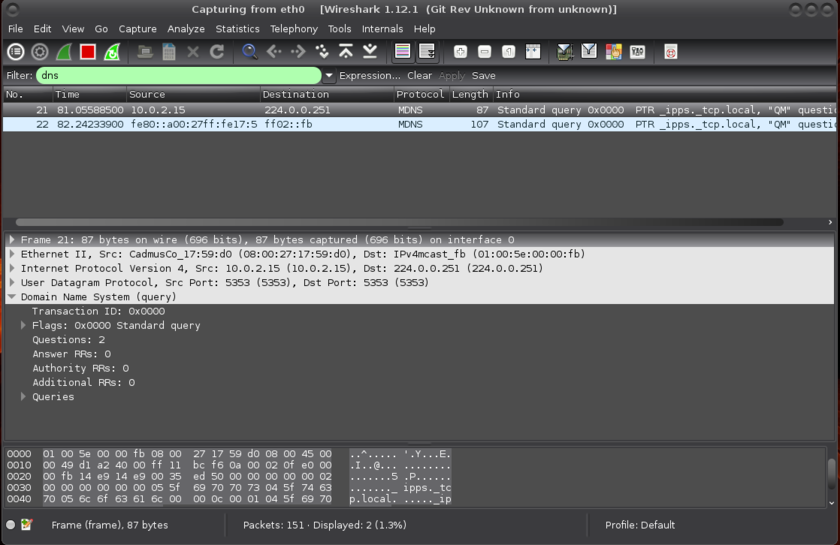
If you’re trying to inspect something specific, such as the traffic a program sends, it helps to close down all other applications using the network so you can narrow down the traffic. Still, you’ll likely have a large amount of packets to sift through. That’s where filtering come in. | If you’re trying to inspect something specific, such as the traffic a program sends, it helps to close down all other applications using the network so you can narrow down the traffic. Still, you’ll likely have a large amount of packets to sift through. That’s where filtering come in. | ||
| Line 878: | Line 880: | ||
==== Inspecting packets ==== | ==== Inspecting packets ==== | ||
| − | |||
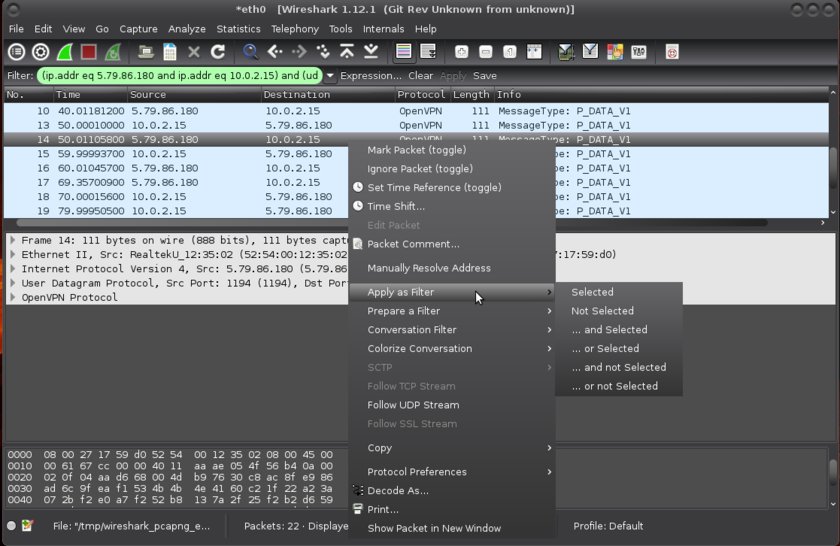
Click a packet to select it and you can dig down to view its details. You can also create filters by using the ''Apply as Filter'' submenu to create a filter based on it (those ''and''s and ''or''s are boolean algebra): | Click a packet to select it and you can dig down to view its details. You can also create filters by using the ''Apply as Filter'' submenu to create a filter based on it (those ''and''s and ''or''s are boolean algebra): | ||
| Line 884: | Line 885: | ||
== Configuring sysctl (*) == | == Configuring sysctl (*) == | ||
| − | |||
<code>sysctl</code> is a tool for examining and changing kernel parameters at runtime, a near-necessary tool in the defense from malware. | <code>sysctl</code> is a tool for examining and changing kernel parameters at runtime, a near-necessary tool in the defense from malware. | ||
| Line 956: | Line 956: | ||
== Auditing your setup == | == Auditing your setup == | ||
| − | |||
[[File:Look-at-all-the-fucks-i-give.jpg|300px|thumb|right]] | [[File:Look-at-all-the-fucks-i-give.jpg|300px|thumb|right]] | ||
=== Tiger === | === Tiger === | ||
| Line 963: | Line 962: | ||
It consists of Bourne Shell scripts, C code and data files used for checking for security problems on a UNIX system. It scans system configuration files, file systems, and user configuration files for possible security problems and creates a report on issues found. | It consists of Bourne Shell scripts, C code and data files used for checking for security problems on a UNIX system. It scans system configuration files, file systems, and user configuration files for possible security problems and creates a report on issues found. | ||
| − | ==== Installing ==== | + | ==== Installing tiger ==== |
| − | + | ||
$ sudo apt-get install tiger | $ sudo apt-get install tiger | ||
| − | ==== Configuring ==== | + | ==== Configuring tiger ==== |
| − | + | ||
* You can mess with the tiger variables in the <code>/etc/tiger/tigerrc</code> configuration file. For each available module there is a corresponding variable in the file that determines whether the module is run. A variable can be set equal to Y to run, or N to skip. Other configuration variables will modify the behaviour of some modules, and can be adjusted based on the operating system. | * You can mess with the tiger variables in the <code>/etc/tiger/tigerrc</code> configuration file. For each available module there is a corresponding variable in the file that determines whether the module is run. A variable can be set equal to Y to run, or N to skip. Other configuration variables will modify the behaviour of some modules, and can be adjusted based on the operating system. | ||
* The <code>/etc/tiger/tiger.ignore</code> configuration file defines the set of messages that will not be presented in the report even if any of the modules generate them. All entries (per line) are used as extended regular expressions that are compared against each message (mind the overhead which grows with the size of the file). | * The <code>/etc/tiger/tiger.ignore</code> configuration file defines the set of messages that will not be presented in the report even if any of the modules generate them. All entries (per line) are used as extended regular expressions that are compared against each message (mind the overhead which grows with the size of the file). | ||
| − | ==== | + | ==== Using tiger ==== |
| − | + | ||
The command tig‐exp(8) can be used to obtain explanations of the problems reported by tiger. Doing a first run can be shocking (not boring). For all listed fixes below the explanations are included. | The command tig‐exp(8) can be used to obtain explanations of the problems reported by tiger. Doing a first run can be shocking (not boring). For all listed fixes below the explanations are included. | ||
| Line 990: | Line 986: | ||
For example <code>www-data</code> in most cases, does not need a shell, but some cgi could need it. Historically all users under UID 99 had a <code>/bin/sh</code> as login shell, and the ones found and listed here by tiger are historic or legacy users, for all “modern” linux services already come preconfigured to <code>/bin/false</code>. For those not preconfigured, you can dig into your system to know what each user does there: | For example <code>www-data</code> in most cases, does not need a shell, but some cgi could need it. Historically all users under UID 99 had a <code>/bin/sh</code> as login shell, and the ones found and listed here by tiger are historic or legacy users, for all “modern” linux services already come preconfigured to <code>/bin/false</code>. For those not preconfigured, you can dig into your system to know what each user does there: | ||
| − | * Do a <code>top</code> or a <code>ps | + | * Do a <code>top</code> or a <code>ps aux</code> and check the users; if there’s a process started by “nobody” user you can’t delete it. |
* Also check crontab and cron.d; if you delete a user required for starting a cron job, that job will never work again. | * Also check crontab and cron.d; if you delete a user required for starting a cron job, that job will never work again. | ||
* Another useful check is to check the <code>/etc/shadow</code> file and see which second fields are X (crossed out) for which accounts. | * Another useful check is to check the <code>/etc/shadow</code> file and see which second fields are X (crossed out) for which accounts. | ||
| Line 1,073: | Line 1,069: | ||
$ sudo sysctl w net.ipv4.conf.default.log_martians=1 | $ sudo sysctl w net.ipv4.conf.default.log_martians=1 | ||
| − | Yes, yes, I had forgotten those default versions. Also corrected | + | Yes, yes, I had forgotten those default versions. Also corrected in sysctl (*). |
== Resources == | == Resources == | ||
| + | |||
| + | === RandomSource === | ||
| + | * Dual EC DRBG https://projectbullrun.org/dual-ec/ | ||
=== General === | === General === | ||
| Line 1,081: | Line 1,080: | ||
=== Debian === | === Debian === | ||
| − | |||
* Security information https://www.debian.org/security/ | * Security information https://www.debian.org/security/ | ||
* Securing Debian Manual https://www.debian.org/doc/manuals/securing-debian-howto/index.en.html | * Securing Debian Manual https://www.debian.org/doc/manuals/securing-debian-howto/index.en.html | ||
=== Ubuntu === | === Ubuntu === | ||
| − | |||
* Ubuntu security notices http://www.ubuntu.com/usn/ | * Ubuntu security notices http://www.ubuntu.com/usn/ | ||
* Basic Ubuntu Security Guide, Desktop Edition https://wiki.ubuntu.com/BasicSecurity | * Basic Ubuntu Security Guide, Desktop Edition https://wiki.ubuntu.com/BasicSecurity | ||
=== Mint === | === Mint === | ||
| − | |||
* Forum http://forums.linuxmint.com/viewforum.php?f=143&sid=144ced36d297bed0a2330fda9abc9d40 | * Forum http://forums.linuxmint.com/viewforum.php?f=143&sid=144ced36d297bed0a2330fda9abc9d40 | ||
| Line 1,099: | Line 1,095: | ||
== Related == | == Related == | ||
| − | |||
* [[Installing linux]] | * [[Installing linux]] | ||
* [[Linux applications]] | * [[Linux applications]] | ||
| Line 1,108: | Line 1,103: | ||
* [[Shell scripting]] | * [[Shell scripting]] | ||
| − | [[Category: | + | [[Category:How_To]] |
Latest revision as of 07:08, 17 November 2015
This page contains some basic security measures specifically for people getting started with linux. Knowing your way around a bit on the kinky linux command-line helps. If you run into trouble, find us on IRC.
Contents
- 1 Setting up root mail
- 2 Installing intrusion detection
- 3 Installing rootkit scanners
- 4 Managing passwords
- 5 Blacklisting modules
- 6 Using a firewall
- 7 Safer browsing
- 8 Using removable storage media
- 9 Encryption
- 10 Making backups
- 11 Traffic monitoring
- 12 Configuring sysctl (*)
- 13 Auditing your setup
- 14 Resources
- 15 Related
Setting up root mail
- Exim uses the Sendmail design model where a single binary controls all the facilities of the MTA. This monolithic design is inherently less secure due to the lack of binary separation between the individual components of the system. Exim separates processes and has well-defined stages where it gains or loses privileges.
- Postfix has a modular design to improve security over Qmail. A master daemon (a background process) launches other smaller processes with limited privileges that do specific tasks related to the various stages of mail delivery. The modular approach limits the effects of attacks.
- Sendmail is the default MTA shipped with many Linux distribution sets and is the most well-known. It is easy to configure but had the most security loopholes, partly because it was designed long before hackers started attacking email systems. Developers fix most security issues quickly, but because it has the most number of users, it is still the biggest target for hackers.
Postfix
Debian with MATE comes with the exim mailserver installed. If you don't like exim, install postfix (if you install the one, the other is uninstalled).
Installing postfix
To install postfix:
$ sudo apt-get install postfix
Setting up local email account
Next is setting up an account in a mail client.
icedove
The wizard of icedove (thunderbird) does not allow directly for setting up local mail adresses. Choose "I think I'll configure my account later.":
Make the menu appear, and choose the big Movemail link (all the way to the right of the blue email):
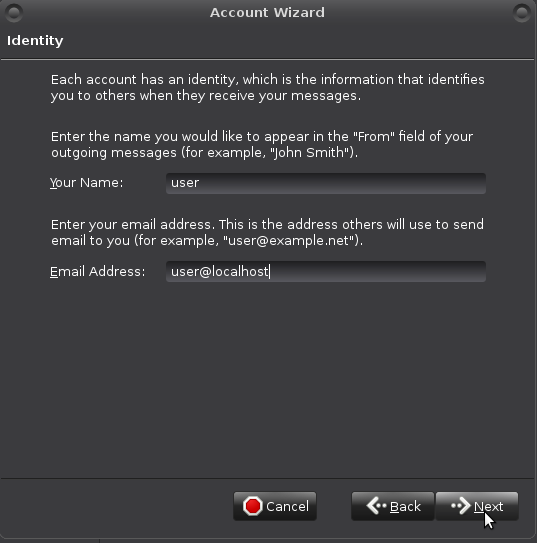
Fill in "Identity" data like so:
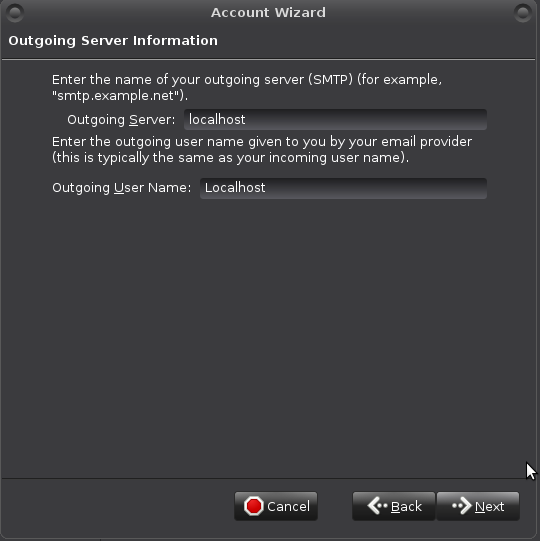
Outgoing Server Information like so (will be revisited):
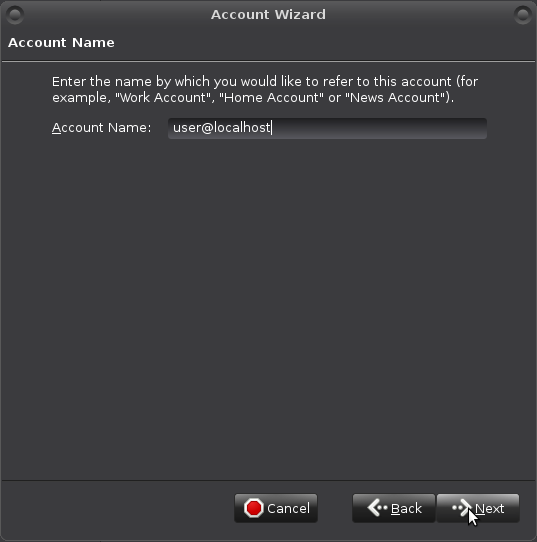
Your "Account Name":
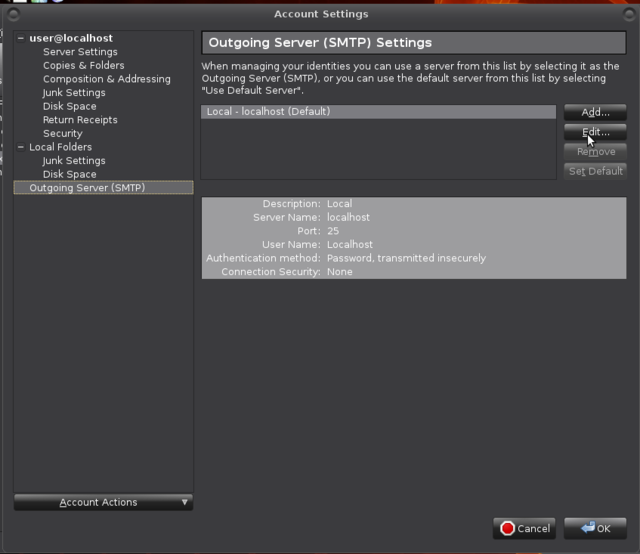
If all went well the account has appeared. Revisit SMTP settings: Edit > Account Settings -> Outgoing Server (SMTP) -> Edit
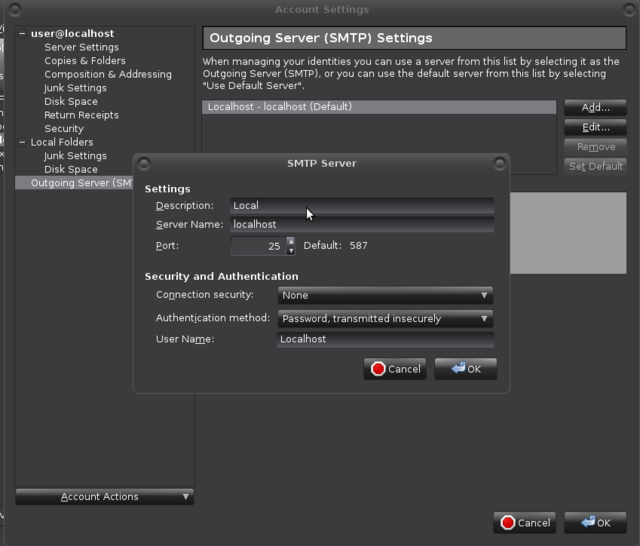
Set Port 25:
You may already have messages for user. Maybe not for root yet.
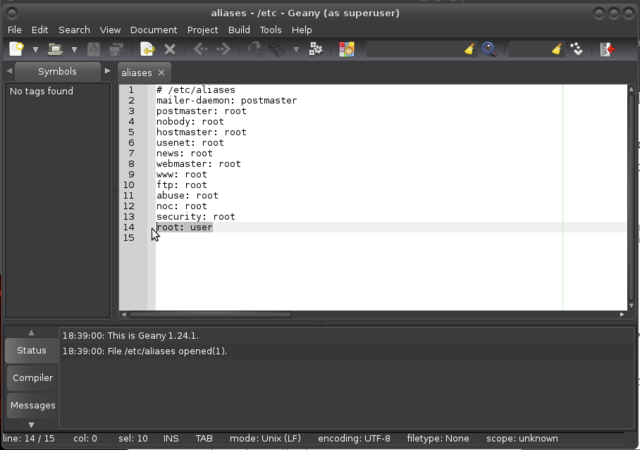
Open /etc/aliases with your favourite editor (vi, vim, nano, geany):
$ sudo geany /etc/aliases
And make sure there is a root: username, username being *your* username of course, and a postmaster: root line in the file.
Installing intrusion detection
You can use a firewall, keep your system softwares up to date, stop all unrequired services, use long and difficult passwords and password managers, and more (see below), there is still a chance that some intruder might get into your system.
When intruders penetrate your system there is a great chance that they will want to make their presence as quiet as possible. To do so, they are most likely to replace some common binaries such as ls, netstat or ps with versions that will not make their presence visible. For example, ls can be replaced with an ls version that won't show the files they created, netstat will not show connections that are used by the intruder, and ps will hide processes the intruder runs. To detect changes like that in your system, you can set up intrusion detection with for example aide or tripwire.
Aide and tripwire are both File Integrity Agents (FIAs). A FIA monitors the integrity and state of the files and objects on your machine. If it detects changes to those files, then it alerts the administrator that an unauthorised access or change has taken place. FIAs usually take a hash of all files to be monitored using an algorithm like MD5. The snapshot is periodically checked against the current hash of the file and any variations alerted on.
For some "aide vs tripwire" notes, see Linux applications: Intrusion detection, and for an example install of tripwire on a server, see Linux server security: Installing intrusion detection.
aide
Installing aide
To install aide on a debian based system:
$ sudo apt-get install aide
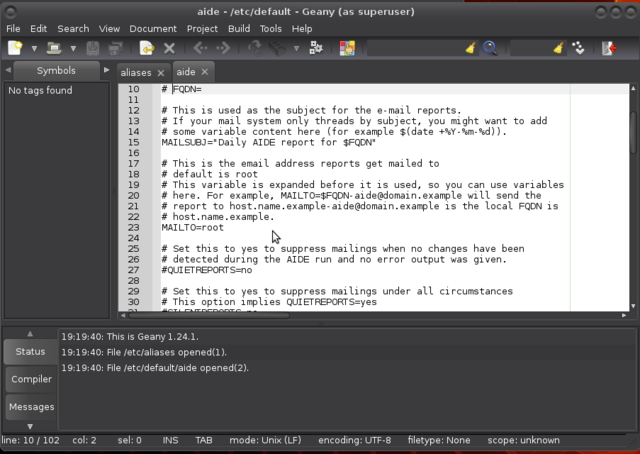
Open up /etc/default/aide with your favourite editor to change who to send its reports to:
$ sudo geany /etc/default/aide
Initialising aide
Initialise (this can take some time):
$ sudo aideinit
Configuring aide
Most of aide configuration can be found in /etc/aide/aide.conf. This file is pretty well documented and default rules are quite decent. Aide aims at reporting files that changed since the last snapshot (stored in /var/lib/aide/aide.db). In hostile environments, a good security measure is to keep the database file on a floppy disk, cdrom or external disk. If you have such a device, you can copy the current snapshot to it and use the snapshot from that device during later runs of aide.
Before making modifications to the configuration file, make a backup first:
$ sudo cp /etc/aide/aide.conf /etc/aide/aide.conf.old
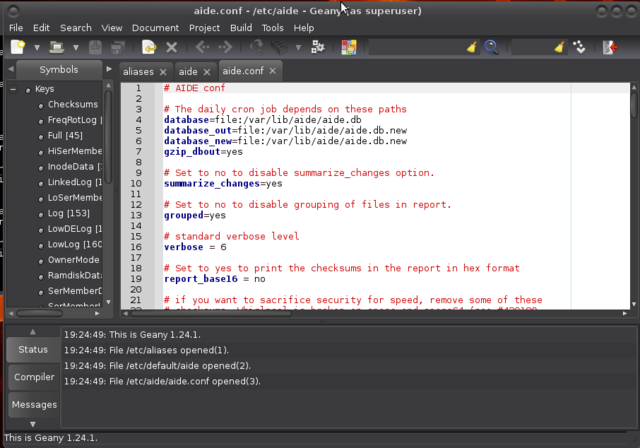
So let say that you have a copy of aide.db on an external disk. To use that snapshot, you can change database=file:/var/lib/aide/aide.db to database=file:/media/user/drive/aide/aide.db:
Read through the file to acquaint yourself with aide. By default, changes in Binaries and Libraries directories are checked. Those are matched to the BinLib rule, which basically checks for any changes in permissions, ownership, modification, access and creation date, size change, md5 and sha1 signature, inode, number of links and block count. Then, it also checks for modifications in the log files against the rule Logs. Because log files tend to grow, you cannot use a signature there and you also have to ask aide not to check for size modification (S).
Using aide
On debian alikes, aide is run on a daily basis through the script /etc/cron.daily/aide. Default settings in /etc/default/aide tells aide to update it's database. Using database_out value in /etc/aide/aide.conf, aide is going to output a new database any time it runs in /var/lib/aide/aide.db.new if you kept the default settings.
Any time you install new packages or change some configuration settings, run:
$ sudo /etc/cron.daily/aide
And check in the report that any modifications were only done to files you intended to modify and that added files are only coming from packages you have just installed and copy the new database to whatever place your database points to. Great way to learn about linux and non-intended changes too.
tripwire
Installing tripwire
To install tripwire on a debian-based system:
$ sudo apt-get install tripwire
[sudo] password for user:
Reading package lists... Done
Building dependency tree
Reading state information... Done
The following NEW packages will be installed:
  tripwire
0 upgraded, 1 newly installed, 0 to remove and 0 not upgraded.
Need to get 1,385 kB of archives.
After this operation, 10.4 MB of additional disk space will be used.
Get:1 http://ftp.is.debian.org/debian/ jessie/main tripwire amd64 2.4.2.2-4 [1,385 kB]
Fetched 1,385 kB in 0s (1,669 kB/s)
Preconfiguring packages ...
Selecting previously unselected package tripwire.
(Reading database ... 142010 files and directories currently installed.)
Preparing to unpack .../tripwire_2.4.2.2-4_amd64.deb ...
Unpacking tripwire (2.4.2.2-4) ...
Processing triggers for man-db (2.7.0.2-5) ...
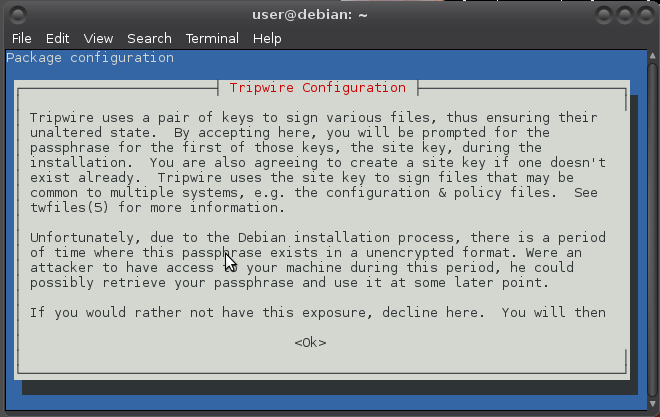
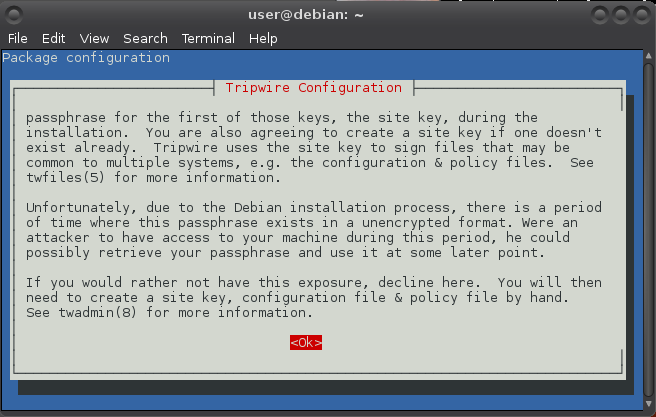
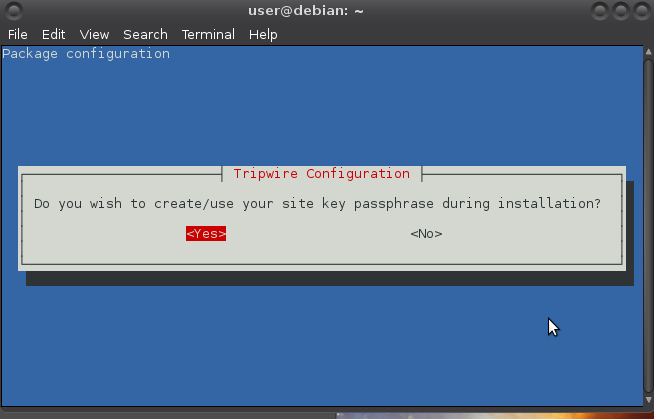
Setting up tripwire (2.4.2.2-4) ...
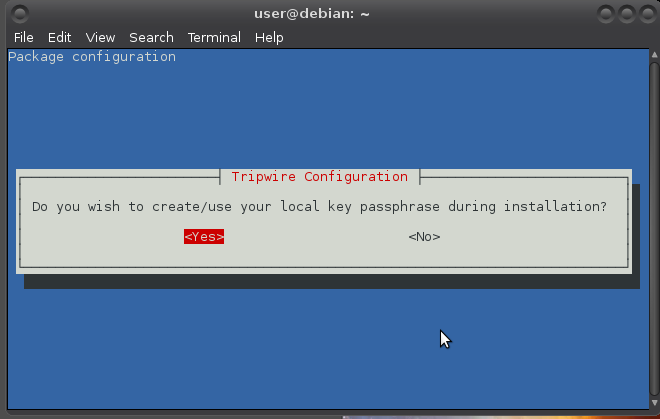
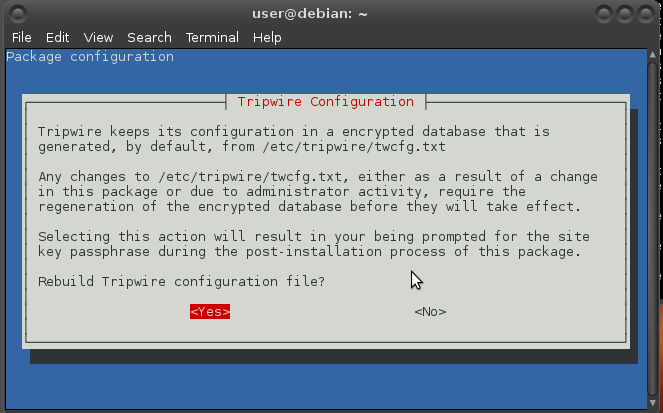
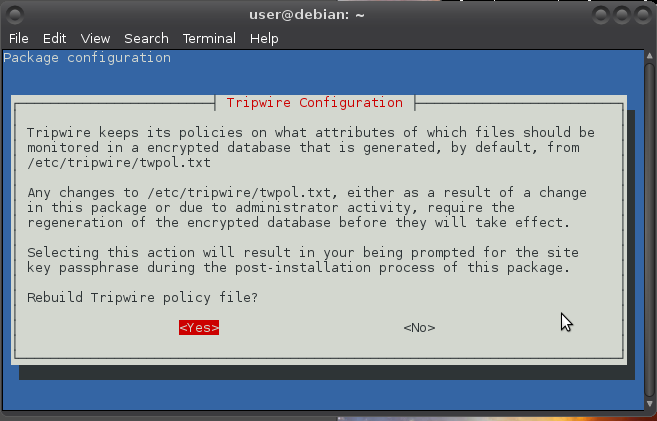
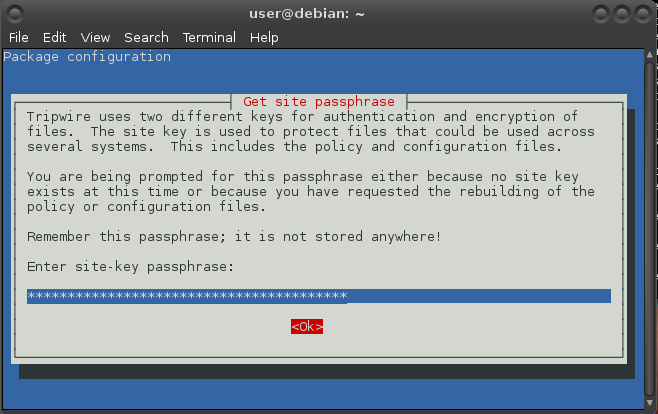
Use the arrow keys to navigate:
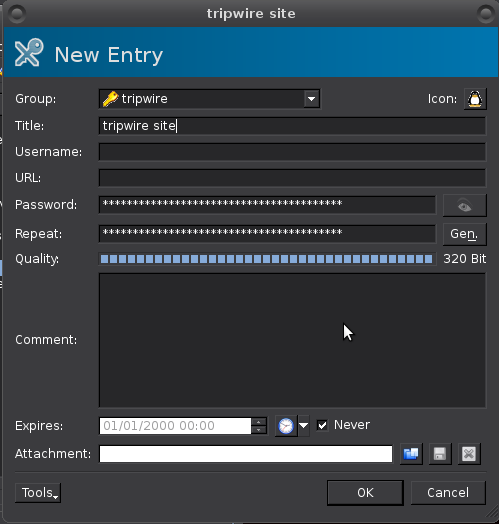
"Remember that passphrase", for example in keepassx (I had keepassx generate the passphrase):
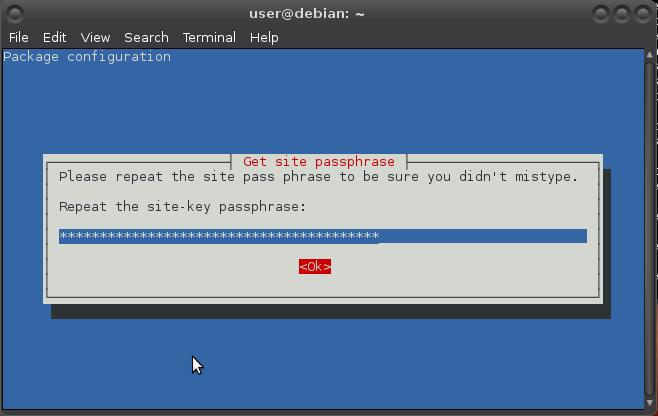
Repeat:
Generating site key (this may take several minutes)...
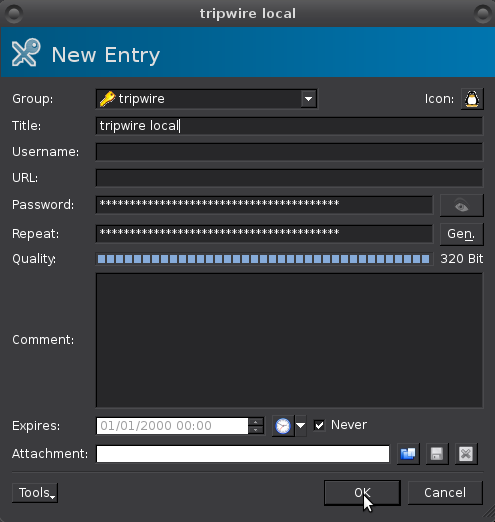
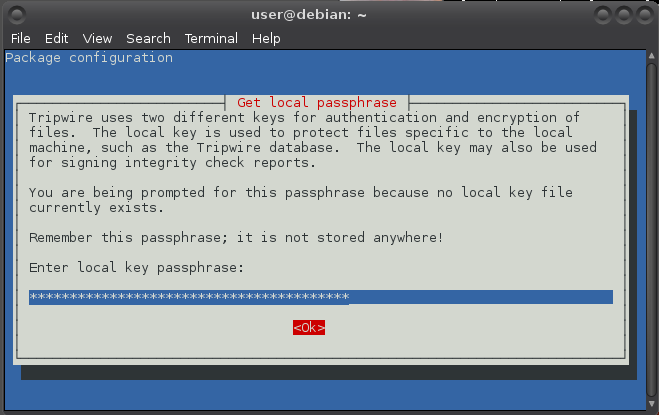
Do the same for local passphrase:
Generating local key (this may take several minutes)...
Configuring tripwire
Just after install the tripwire directory /etc/tripwire contains a number of files, two of which are useful for its configuration.
-
twcfg.txtis for general configuration and can easily be the same for all the computers on the same local network. It contains “things” like the location of the tripwire database, instructions for minimising the amount of time the passphrases are kept in memory, and the number of redundant reports. -
twpol.txtcontains the policy that declares all the objects that must be monitored and what to do when one of them is lost or altered. Unlike the configuration file, the policy could (and almost certainly will) vary across the several computers on the same network.
For security reasons (preventing a malicious intruder from spoofing tripwire into giving a false “okay” message) tripwire uses these cleartext files to create binary files for database checking rather than the cleartext files (that are best immediately removed after the deed). If you make incorrect edits to either of these files, you will have to restore from backup or tripwire will not be able to create its database. Before making modifications to the configuration files, make a backup first:
$ cd /etc/tripwire
$ sudo cp twcfg.txt twcfg.txt.old
$ sudo cp twpol.txt twpol.txt.old
Initialising tripwire
Install default policy as root (mind the capital P, and know the cursor does not move at all when copy/pasting the passphrase (right-click works on the command-line for copy/pasting)):
# /usr/sbin/twadmin -m P /etc/tripwire/twpol.txt
Please enter your site passphrase:
Wrote policy file: /etc/tripwire/tw.pol
Still as root, generate the initial database (You will be asked for your local passphrase):
# /usr/sbin/tripwire -m i
Please enter your local passphrase:
Parsing policy file: /etc/tripwire/tw.pol
Generating the database...
*** Processing Unix File System ***
It may take a while and then:
### Warning: File system error.
### Filename: /var/lib/tripwire/debian.twd
### No such file or directory
### Continuing...
Of course no such database exists (yet). This is the initial run to create it.
And a bunch of these appear with (hopefully) a success message at the end:
### Warning: File system error.
### Filename: /proc/5199/fd/4
### No such file or directory
...
The object: "/proc/sys/fs/binfmt_misc" is on a different file system...ignoring.
Wrote database file: /var/lib/tripwire/debian.twd
The database was successfully generated.
The twpol.txt file distributed with tripwire contains anything that could be on a UNIX system, so it is guaranteed to complain about programs that you never installed or placed in a different location. These false positives are created when there is a discrepancy between the default policy and the actual local configuration. ACTUALLY!!!!! :D
Some further customization is necessary to prevent these large numbers of false positives. The “thing” to do to create a good policy is to remove as many unneeded programs as possible before starting. Next, to make your usage as quick and effective as possible, your policy must cover everything you really need to monitor and nothing else. This includes, at least, all the system binary and library directories (minimally the contents of /bin, /sbin, /usr/bin, /lib) and the corresponding configuration files in /etc.
As of version 2.3.1.2-5, the tripwire package manages policy at a directory level: if a directory appears in the policy, tripwire will add the files in that directory. Not all directory policy entries are recursive and tripwire may not check the contents of those subdirectories.
To generate a listing of the discrepancies between the local system and the default policy (or just do the first bit without grep and search for occurrences of "Filename"):
# /usr/sbin/tripwire -m c | grep Filename >> twtest.txt
Waaaait for it! When this listing has been generated, edit /etc/tripwire/twpol.txt again, and comment out or delete each of the filenames listed in twtest.txt. Use your preferred editor (mine is geany):
# geany /etc/tripwire/twpol.txt
And there are other files in the default policy that may not make sense to monitor on your local system. These include lock files (which identify that some process is in use) and pid files (which identify the process ID of some daemons). Such files are likely to change often, if not at every system boot, and they can cause tripwire to generate false positives. You can comment out all of the /var/lock/subsys entries as well as the entry for /var/run.
After that you need to re-install default policy and generate the database again. This can result in:
*** Processing Unix File System ***
The object: "/dev/hugepages" is on a different file system...ignoring.
The object: "/dev/mqueue" is on a different file system...ignoring.
The object: "/dev/pts" is on a different file system...ignoring.
The object: "/dev/shm" is on a different file system...ignoring.
### Warning: File system error.
### Filename: /proc/22273/fd/4
### No such file or directory
### Continuing...
### Warning: File system error.
### Filename: /proc/22273/fdinfo/4
### No such file or directory
### Continuing...
### Warning: File system error.
### Filename: /proc/22273/task/22273/fd/4
### No such file or directory
### Continuing...
### Warning: File system error.
### Filename: /proc/22273/task/22273/fdinfo/4
### No such file or directory
### Continuing...
The object: "/proc/sys/fs/binfmt_misc" is on a different file system...ignoring.
Any /dev entries spell that the /dev file system also has other file systems mounted as /dev/hugepages, /dev/mqueue, /dev/pts, and /dev/shm. Similar objects in proc are also ignored. Directories in /proc change all the time and it is a pseudo-filesystem. My solution is to comment out both /dev and /proc and add the listed objects that have appeared and that appear.
The object: "/proc/sys/fs/binfmt_misc/register" is on a different file system...ignoring.
The object: "/proc/sys/fs/binfmt_misc/status" is on a different file system...ignoring.
binfmt_misc is a capability of the Linux kernel which allows arbitrary executable file formats to be recognised and passed to certain user space applications, such as emulators and virtual machines. The executable formats are registered through a special purpose file system interface (similar to /proc). Debian-based distributions provide the functionality through an extra binfmt-support package. Needs monitoring. So, added those two as well.
After that you need to re-install default policy and generate the database again.
Cleaning up
It is now safe to delete the clear text versions of the tripwire policy and configuration files:
# rm /etc/tripwire/twcfg.txt /etc/tripwire/twpol.txt
If they need to be restored, cleartext versions of these files can be created from the by tripwire encrypted versions (lowercase p):
# usr/sbin/twadmin -m p > /etc/tripwire/twpol.txt
Using tripwire
$ sudo /usr/sbin/tripwire -m c
The management at a directory level also means that addition of packages to a system will almost certainly require the updating or regeneration of the tripwire database.
External drive
If you wish to use an external drive for holding the binaries and/or database, on the external drive create a directory tripwire to hold both the tripwire binary in /usr/bin/ and databases in /var/lib/tripwire so that if and when your system is compromised and the drive is mounted, the intruder would need root to change the files (-rwxr-xr-x). Also create an /etc/tripwire directory for file manipulation on the drive.
This setup has several problems. Even with the paths set to the drive directories and files, when running tripwire from the drive the resulting report is put in the /var/lib/tripwire directory on the local machine (not on the drive), and when re-initialising the database the database is also put in the directory on the local machine. Plus that running tripwire from the drive expects the database in /var/lib/tripwire on the local machine. Rather than hacking the code, I used a workaround and added two little zero version scripts to my shell scripting wardrobe, one for running tripwire from the drive and another one for updating the tripwire policy database.
The binaries to copy from /usr/sbin are:
- tripwire: The main file; used for initialising the database, checking the integrity of the file system, updating the database and updating the policy.
- twadmin: tripwire’s administrative and utility tool; used for creating and printing configuration files, replacing and printing a policy file, generating site and local keys and other encryption related functions.
- twprint: Used to print the reports and database in human-readable format.
- siggen: Generates the various hashes that tripwire supports for checking the integrity of files.
With drive being the name of your drive as root (sudo -s):
# cp -R /var/lib/tripwire /media/user/drive/tripwire/var/lib/
and copy the binaries tripwire, twadmin, siggen and twprint:
# cp /usr/sbin/tripwire /media/user/drive/tripwire/usr/sbin/
# cp /usr/sbin/twadmin /media/user/drive/tripwire/usr/sbin/
# cp /usr/sbin/siggen /media/user/drive/tripwire/usr/sbin/
# cp /usr/sbin/twprint /media/user/drive/tripwire/usr/sbin/
Change DBFILE and REPORTFILE with your preferred text editor in /etc/tripwire/twcfg.txt to reflect the location on your external drive:
# geany /etc/tripwire/twcfg.txt
And in twpol.txt change TWBIN and TWVAR to reflect their locations on the external drive:
# geany /etc/tripwire/twpol.txt
Installing rootkit scanners
A rootkit is a collection of tools a hacker installs on a victim's computer after gaining initial access. It generally consists of network sniffers, log-cleaning scripts, and trojaned replacements of core system utilities such as ps, netstat, ifconfig, and killall. Most times they are self-hiding toolkits to avoid the eye of the sysadmin. Applications that are used to detect rootkits are known as rootkit scanners. There are two rootkit scanners that are important to have on your linux box: rkhunter and chkrootkit. Both. They may not stop a sophisticated adversary, they do help us see mistakes we make.
rkhunter
Rootkit Hunter (rkhunter) is a shell script to detect known rootkits or malware. It also performs checks to see if commands have been modified, and various checks on the network interfaces, including checks for listening applications.
Installing rkhunter
You can install it from the Software Center or synaptic, or from the commandline:
$ sudo apt-get install rkhunter
Or you can get get it from http://sourceforge.net/projects/rkhunter/ or check current version number and use wget:
$ wget http://downloads.sourceforge.net/project/rkhunter/rkhunter/1.4.2/rkhunter-1.4.2.tar.gz
After download, extract the files and enter the resulting directory:
$ tar xzvf rkhunter*
$ cd rkhunter*
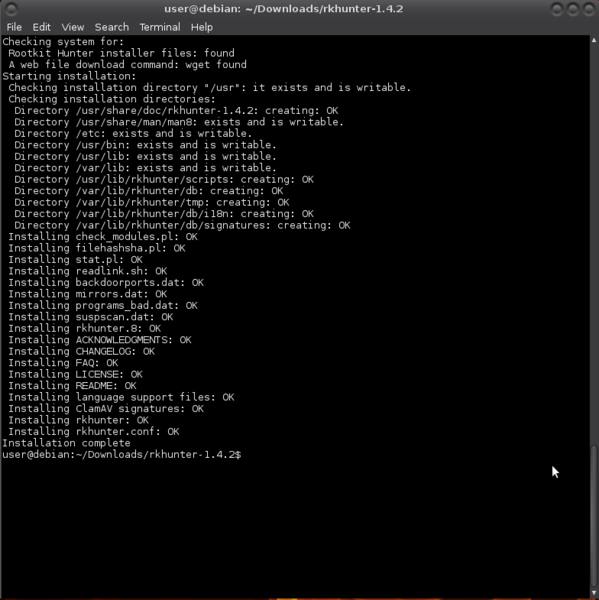
Run the install script:
$ sudo ./installer.sh --layout /usr --install
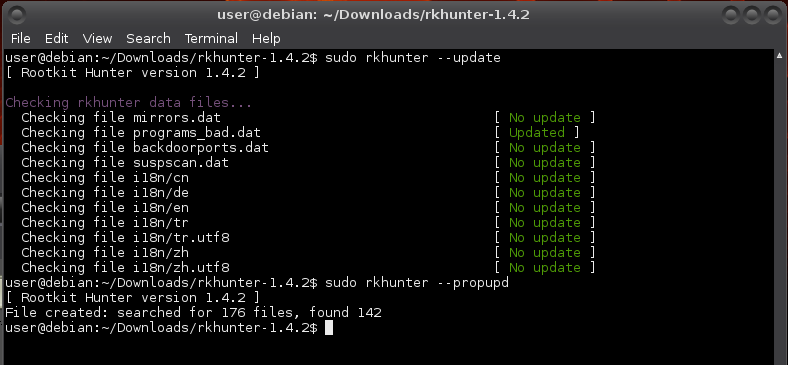
Updating database
Update the rkhunter database:
$ sudo rkhunter --update
This command has to be run on a regular basis to keep the database of known rootkits current. You can use cron to schedule running of this command at regular intervals. See Running jobs, jobs, jobs! for more on running commands or scripts at a given date and time.
Baselining rkhunter
Set baseline file properties by checking the current values and storing them as known-good values:
$ sudo rkhunter --propupd
rkhunter is configured to be generic and each distro can (and most do) diverge from expected defaults. These appear during an initial run as false positives:
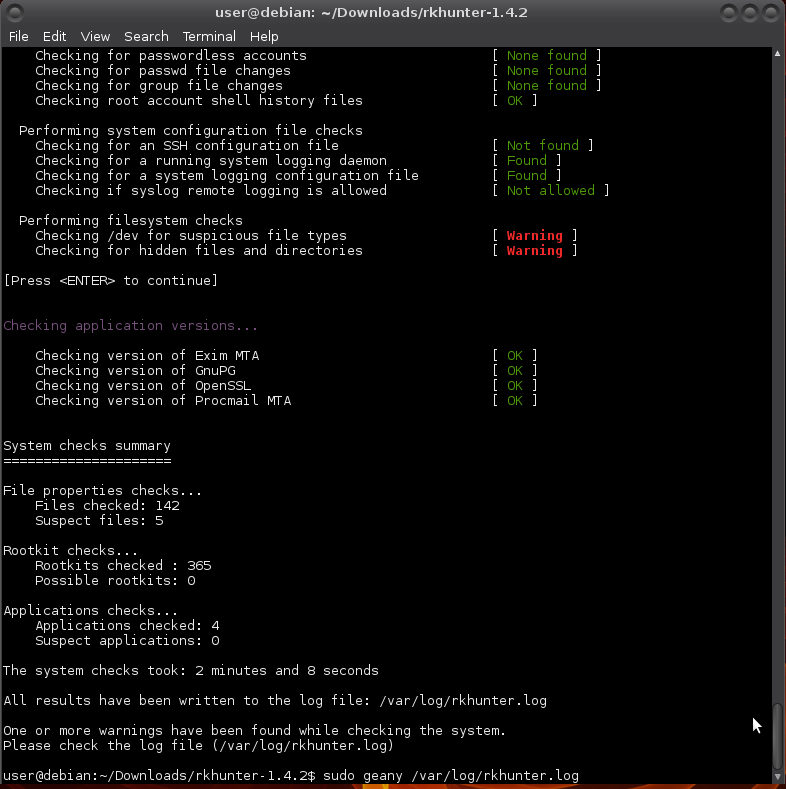
$ sudo rkhunter -c --enable all --disable none
You'll get groups of results, warnings, and at the end a summary of the results.
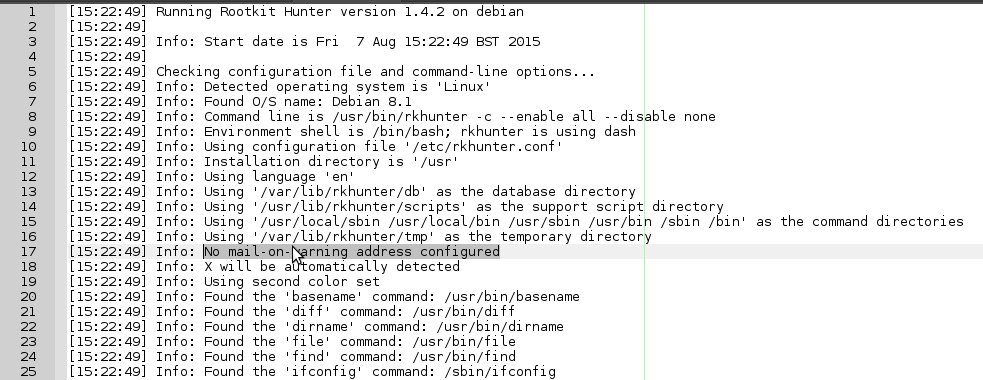
You can have a look at more details of the warnings in /var/log/rkhunter.log.
$ sudo geany /var/log/rkhunter.log
I immediately encounter these noticeable two:
Sometimes if you change something, more warnings vanish or appear, so I always work on a few unrelated ones, then run --propupd and rkhunter -c again as shown above, until I no longer have warnings. Open up rkhunter's configuration file:
$ sudo geany /etc/rkhunter.conf
Remove the # in front of MAIL-ON-WARNING and replace the fake email adresses with your local mail account (see above):
Likewise set the package manager:
I am also getting warnings from the deleted_files test:
No problem. Mate and iceweasel need to be able to use tmp files. You can make the strings to allow processes using deleted files for in /etc/rkhunter.conf (on debian-based):
$ sudo awk '/Process: / {print "ALLOWPROCDELFILE="$3}' /var/log/rkhunter.log | sort -u
[sudo] password for user:
ALLOWPROCDELFILE=/usr/bin/mate-terminal
ALLOWPROCDELFILE=/usr/lib/iceweasel/iceweasel
Select and copy/paste the strings to the /etc/rkhunter.conf file (right-click mouse will give you the option to copy from command-line):
And a warning from the packet_cap_apps test:
Get the strings for allowing (current) packet capturing applications:
$ sudo awk -F"'" '/is listening on the network/ {print "ALLOWPROCLISTEN="$2}' /var/log/rkhunter.log
[sudo] password for user:
ALLOWPROCLISTEN=/sbin/dhclient
and I only needed to comment it out:
A few suspicious files and a hidden dir from the filesystem test:
/dev/shm is an implementation of traditional shared memory concept for passing data between programs. One program will create a memory portion, which other processes (if permitted) can access. Like a tmp file. A performance choice. /dev/shm/pulse-shm-0123456789 or whatever number seems not dangerous for the system. It's a clean install, and I'll whitelist it.
If I were to just add a line ALLOWDEVFILE=/dev/shm/pulse-shm-0123456789 to the rkhunter configuration file, this will stop the warning. Until I reboot. The numbers in the end of pulse-shm files change on every start and is unpredictable. This is where regular expressions and wildcards come in handy. As it is, it only needs commenting out:
The presence of the hidden /etc/.java directory also gives me a warning. So often do /dev/.udev, /dev/.static and /dev/.initramfs. These are known hidden (sofar) non-malignent hidden directories and can simply be whitelisted (only needs commenting out):
ALL GREEN. Purrrrfect baseline. For now. :) In the near future more applications may try to use deleted files, and after installation of applications more warnings may appear that I'll have to deal with to keep it green!
unhide
ACTUALLY, nearly all green and two purple:
-
unhide(ps) is for detecting hidden processes and implements six techniques:- Compare
/procvs/bin/psoutput - Compare info gathered from
/bin/pswith info gathered by walking through the procfs. - Compare info gathered from
/bin/pswith info gathered from syscalls (syscall scanning). - Full PIDs space occupation (PIDs bruteforcing)
- Reverse search, verify that all thread seen by
psare also seen by the kernel (/bin/psoutput vs/proc, procfs walking and syscall) - Quick compare
/proc, procfs walking and syscall vs/bin/psoutput.
- Compare
-
unhide-tcpis a forensic tool that identifies TCP/UDP ports that are listening but are not listed in /bin/netstat through brute forcing of all TCP/UDP ports available. It comes with unhide.
$ sudo apt-get install unhide
$ sudo rkhunter --propupd
$ sudo rkhunter -c --enable all --disable none
Now it's all green. :)
chkrootkit
chkrootkit is a shell script that checks system binaries for rootkit modification.
Installing chkrootkit
To install chkrootkit:
$ sudo apt-get install chkrootkit
Configuring chkrootkit
If you want an automatic daily run of chkrootkit, open /etc/chkrootkit.conf and replace RUN_DAILY="false" with RUN_DAILY="true"
$ sudo geany /etc/chkrootkit.conf
Using chkrootkit
Using chkrootkit (perform all tests):
$ sudo chkrootkit
And you may get something like:
Checking `chkutmp'...                    The tty of the following user process(es) were not found in /var/run/utmp !
! RUID          PID TTY    CMD
! root          897 tty7   /usr/bin/X :0 -seat seat0 -auth /var/run/lightdm/root/:0 -nolisten tcp vt7 -novtswitch
chkutmp: nothing deleted
The man utmp reads:
The utmp file allows one to discover information about who is currently using the system. There may be more users currently using the system, because not all programs use utmp logging.
Warning: utmp must not be writable, because many system programs (foolishly) depend on its integrity. You risk faked system logfiles and modifications of system files if you leave utmp writable to any user.
These messages are always worth checking out because chkrootkit compares all the user processes running in the system with what is registered in /var/run/utmp, reporting the fact that this particular process run by root is not registered (is hidden). It doesn't mean your system has cooties (rootkits or loggers), but it might.
In this case it is not the cooties, but xorg listening for remote desktop connection requests. :D I have tried turning it off. Not a good idea.
You may also get:
Searching for suspicious files and dirs, it may take a while... The following suspicious files and directories were found:
/usr/lib/icedove/.autoreg /usr/lib/pymodules/python2.7/.path /usr/lib/jvm/.java-1.7.0-openjdk-amd64.jinfo
These are false positives: https://bugs.debian.org/cgi-bin/bugreport.cgi?bug=789052
Managing passwords
Using a password manager allows you to load passwords in your clipboard, making it hard to catch it with a keylogger (just in case). And all good password managers allow you to generate passwords, making the passwords independent from your personal preferences and harder to crack. One of the easiest password managers is a GUI tool called keepassx:
$ sudo apt-get install keepassx
It will appear in your menu. A "first steps" tutorial can be found here http://keepass.info/help/base/firststeps.html
Recommendations:
- Keep the database on a removable medium like an encrypted USB stick.
- Use a second encrypted stick to keep a backup of that database on.
- For added security, set up the database to use a password as well as a keyfile.
- Try to always close off the application. It uses a lockfile to prevent access by other processes. Quitting the application removes it. If not, and whenever you get a message that you cannot open your database, check on the USB in the directory where the database resides that there isn't a lockfile blocking access. If there is a lockfile while the database is not open for you, just delete the lockfile.
- On rare occasions a database is truly corrupted. That backup on that other stick, phew. :D
If you want to try your hand at cracking your own (current and new) passwords, try one of these http://sectools.org/tag/pass-audit/
Blacklisting modules
Camera
Intruders can gain access to their victims’ computers with remote-access Trojans (RATs) – malware that gives an intruder administrative control over its targeted computers, including, in this case, the ability to remotely control webcams. It’s an invisibly-installed malware program spread via email attachment or by tricking victims into visiting a booby-trapped site.
Tape the camera. It may even be possible to turn it off in BIOS (depending on your version).
Better yet, if you know what driver module is controlling the webcam, you can disable the driver with modprobe -r.
Check with:
$ lsmod | grep "uvc"
If stuff like this appears, your webcam device uses an uvc driver http://www.ideasonboard.org/uvc/:
uvcvideo               79005  0
videobuf2_vmalloc      12816  1 uvcvideo
videobuf2_core         47787  1 uvcvideo
videodev              126451  3 uvcvideo,v4l2_common,videobuf2_core
media                  18305  2 uvcvideo,videodev
usbcore               195340  7 uvcvideo,ums_realtek,usb_storage,ehci_hcd,ehci_pci,usbhid,xhci_hcd
To disable the cam:
$ sudo modprobe -r uvcvideo
To enable the cam:
$ sudo modprobe uvcvideo
If not an uvcvideo driver, try $ sudo lsmod | grep "media" and use the modinfo command to find out more about the modules listed behind it to locate your webcam driver module:
$ sudo modinfo [modulename]
Then replace the "uvcvideo" in the above modprobe command with the name of your driver module.
To disable the webcam at boot (if file not exists, create it):
$ sudo geany /etc/modprobe.d/blacklist.conf
At bottom of the file add this line: blacklist uvcvideo (or the name of your driver instead of "uvcvideo").
Save the file and reboot. Your webcam is no longer functioning.
Microphone
Open the alsa control panel for muting the microphone:
$ sudo alsamixer
You can also use the same modprobe enabling/disabling method as used above for webcam. This page may be helpful for finding your driver module: http://alsa.opensrc.org/ALSA_modules.
Firewire and thunderbolt
A direct memory access (DMA) attack is a type of side channel attack in which an adversary penetrates a device by exploiting the presence of high-speed expansion ports that permit Direct Memory Access. Firewire, thunderbolt and ExpressCard allow (by design) any connecting device full direct memory access to your system. They can be disabled in /etc/modprobe.d/blacklist-dma.conf:
blacklist firewire-core
blacklist thunderbolt
The modules will be blacklisted upon reboot.
Using a firewall
With a firewall, you can:
- Log hosts scanning services that aren't running
- Limit the services that programs can connect to
- Segregate the local network into trust segments (LAN, DMZ, and Internet)
- Redirect ports to the hosts providing the service (NAT).
If this is for a personal machine at home, only the first two are of interest. These are also the two that are most likely to cause issues for a beginning user.
ufw and gufw
Enabling
Mint and ubuntu come with a firewall installed, but it is disabled. Usually it's better to turn it on. Especially on mobile devices like laptops, which sometimes connect to other networks than your own.
The firewall is called ufw (uncomplicated firewall), and can be operated from the terminal (Menu > Accessories > Terminal):
$ sudo ufw enable
Type your password when prompted for it; this will remain entirely invisible, not even asterisks will show, which is normal.
Ufw has a sensible set of default settings (profile), which are fine for the vast majority of home users. So unless you have special wishes: you're done!
Checking status
You can check the status of the firewall with this command:
$ sudo ufw status verbose
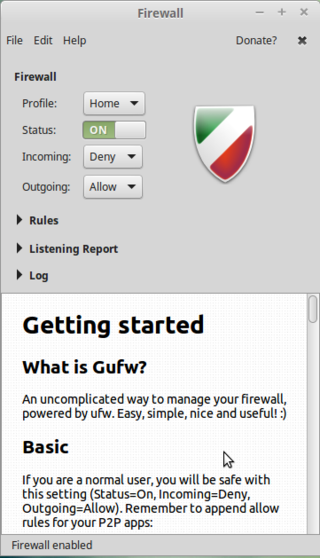
If you wish, you can install a GUI frontend to ufw, called gufw:
$ sudo apt-get install gufw
And it'll be in your menu items (the icon in mint is a brick wall).
Making the rules (ufw)
Found a pretty good no-nonsense tutorial here https://help.ubuntu.com/community/UFW
As example, try your hand at ICMP (see ICMP security notes). By default, UFW allows ping requests. You may find you wish to leave (icmp) ping requests enabled to diagnose networking problems. To disable ping (ICMP) requests, edit /etc/ufw/before.rules and remove the following lines:
# ok icmp codes
-A ufw-before-input -p icmp --icmp-type destination-unreachable -j ACCEPT
-A ufw-before-input -p icmp --icmp-type source-quench -j ACCEPT
-A ufw-before-input -p icmp --icmp-type time-exceeded -j ACCEPT
-A ufw-before-input -p icmp --icmp-type parameter-problem -j ACCEPT
-A ufw-before-input -p icmp --icmp-type echo-request -j ACCEPT
or change the "ACCEPT" to "DROP":
# ok icmp codes
-A ufw-before-input -p icmp --icmp-type destination-unreachable -j DROP
-A ufw-before-input -p icmp --icmp-type source-quench -j DROP
-A ufw-before-input -p icmp --icmp-type time-exceeded -j DROP
-A ufw-before-input -p icmp --icmp-type parameter-problem -j DROP
-A ufw-before-input -p icmp --icmp-type echo-request -j DROP
iptables and netfilter
Installing persistence
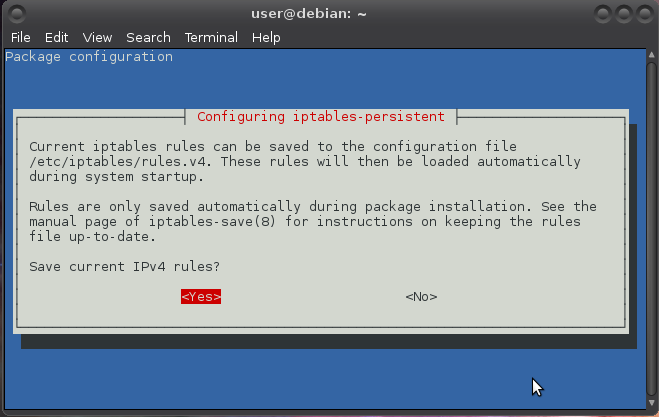
iptables is installed by default. For rules to be persistent (automatically loaded) so they work after reboot, install iptables-persistent. It relies on netfilter-persistent:
$ sudo apt-get install iptables-persistent
[sudo] password for user:
Reading package lists... Done
Building dependency tree
Reading state information... Done
The following extra packages will be installed:
  netfilter-persistent
The following NEW packages will be installed:
  iptables-persistent netfilter-persistent
0 upgraded, 2 newly installed, 0 to remove and 0 not upgraded.
Need to get 18.9 kB of archives.
After this operation, 147 kB of additional disk space will be used.
Configuring iptables
To set it to deny everything except the bare minimum requirements that you need on your system(s) and only accept connections that have been explicitly allowed in the rules:
Accept localhost data:
$ sudo iptables -A INPUT -i lo -j ACCEPT
Accept data related to outbound connections your system has initiated (this includes apt mirrors):
$ sudo iptables -A INPUT -m conntrack --ctstate RELATED,ESTABLISHED -j ACCEPT
You can set up tables for rules for traffic you wish to accept on your system from external connections:
# iptables -N accept_traffic
# iptables -A INPUT -j accept_traffic
You then can use it, for example on a server where you run SSH, with (change port to port you set):
# iptables -A accept_traffic -p tcp --dport 22 -j ACCEPT
The two most common cracks posted on the Ubuntu forums are ssh and vnc, both running with password authentication. This probably is true for all debian-based distro's. You are recommended to secure ssh by using keys (and disabling password authentication) and either configuring iptables (see http://bodhizazen.net/Tutorials/iptables) or using a service such as denyhosts or fail2ban (see Linux server security).
To reject all traffic for which there are no rules set (the first way sends a Host Unreachable ICMP packet then terminates the connection, the second way simply ignores):
# iptables -A INPUT -j REJECT --reject-with icmp-host-unreachable
or:
# iptables -A INPUT -j DROP
Configuring ip6tables
The rules for IPv6 are similar:
Accepting localhost data:
$ sudo ip6tables -A INPUT -i lo -j ACCEPT
Accepting data related to outbound connections your system has initiated:
$ sudo ip6tables -A INPUT -m conntrack --ctstate RELATED,ESTABLISHED -j ACCEPT
Setting up a table:
# ip6tables -N accept_traffic
# ip6tables -A INPUT -j accept_traffic
Rejecting all traffic for which there are no rules set:
# ip6tables -A INPUT -j REJECT --reject-with icmp6-addr-unreachable
or
# ip6tables -A INPUT -j DROP
Making the rules (iptables)
For a readable tutorial on the basics see The Beginner’s Guide to iptables, the Linux Firewall http://www.howtogeek.com/177621/the-beginners-guide-to-iptables-the-linux-firewall or the IP Tables Primer http://bodhizazen.net/Tutorials/iptables/
As example, try your hand at managing IPv4 ICMP packets (see ICMP security notes):
For accepting "Time Exceeded" (necessary for time-restricted connection setups):
$ sudo iptables -A INPUT -p icmp -m icmp --icmp-type 11 -j ACCEPT
For accepting "Destination Unreachable":
$ sudo iptables -A INPUT -p icmp -m icmp --icmp-type 3/4 -j ACCEPT
For accepting PING requests/responses ("Echo" ICMP, for keep-alive requests):
$ sudo iptables -A INPUT -p icmp -m icmp --icmp-type 8 -j ACCEPT
For IPv6 there are a kazillion ICMP requests so if you are not blocking IPv6, it is recommended to not block ICMP packets:
$ sudo ip6tables -A INPUT -p icmpv6 -j ACCEPT
Saving the rules
For saving the rules so they can be loaded at every reboot (you need to have iptables-persistent installed)
# iptables-save > /etc/iptables/rules.v4
# ip6tables-save > /etc/iptables/rules.v6
Safer browsing
It is clear that browsing has the most low cost attack vectors for data theft by hackers, tracking by corporations and for governmental spying. Safer browsing is a good investment all around.
Always use a GNU free software browser. This ensures it can be freely audited. Doesn’t mean it is audited or reviewed. Check for that.
Settings
For disabling flash:
- Firefox: Add-ons > Plugins > Flash > Never Activate.
- Chromium: Settings > Show advanced settings… > Content settings > Do not run plugins by default.
For disabling java:
- Firefox: Add-ons > Plugins > Java > Never Activate.
- Chromium: Settings > Show advanced settings… > Content settings > Do not run plugins by default.
Extensions
Script blockers
The NoScript Firefox extension provides extra protection for Firefox, Seamonkey and other mozilla-based browsers: this add-on allows JavaScript, Java, Flash and other plugins to be executed only by trusted web sites of your choice (e.g. your online bank) http://noscript.net/. There is mozilla talk of “adding NoScript functionality into the core browser”.
The closest Extension to NoScript that I have found for Chromium is ScriptSafe, which has certain operational differences: Apparently ScriptSafe acts more stringently concerning components of Web pages compared to NoScript.
HTTP Switchboard is a scriptblocker AND an adblocker. It is no longer developed. The project has split into two distinct, more advanced extensions: uBlock Origin and uMatrix.
Ad blockers
Ghostery looks for third-party "trackers" on web pages. These can be social network widgets, advertisements, invisible pixels used for tracking and analytics, etc. It notifies of presence and companies operating the trackers and allows for blocking the trackers.
BUT how do they make money? Ghostery sells the tracking data that users (who volunteer for this) gather from sites they visit. Ghostery Inc. then sells this data to the companies that run the sites [1].
Restricting access to browsing history
SafeHistory restricts the marking of visited links on the basis of the originating document, defending against web privacy attacks that remote sites can use to determine your browser history at other sites https://addons.mozilla.org/en-US/firefox/addon/safehistory/ (and cannot be installed in up-to-date iceweasels anymore)
Using removable storage media
A simple but straightforward security method is to keep all sensitive information on removable storage media like portable flash memory drives or external hard drives that you only mount the device when you need access to it.
You can turn old harddrives into external harddrives by taking them out of an old PC and putting them in a portable HDD USB storage kit (alias harddrive enclosure). These "DIY" kits are available for 2.5 inch and 3.5 inch HDD using either IDE or SATA connections and cost way less than a manufactured USB HDD.
You can check state, and turn write protect of a drive (or USB stick) on and off (during initialization and updates) with hdparm http://linux.die.net/man/8/hdparm
You may have a permission problem accessing it. If so, change the group of /media/[externaldisk] to storage, change permissions to 775 and add users that need to be able to write to disk to the storage group (re-login required before changes are visible).
As root (or use sudo) do:
# chgrp storage /media/[externaldisk]
# chmod 775 /media/[externaldisk]
# gpasswd -a [user] storage
This way everyone will be able to read the disk, but only root and users in storage group will be able to write to it. If you want everyone to be able to read/write, use chmod 777. If the operation isn't permitted while running it as root you probably need to add support for the NTFS file system first:
# apt-get update
# apt-get install ntfs-3g
Encryption
But the most popular forms of security all rely on encryption, the process of encoding information in such a way that only the person (or computer) with the key can decode it. Or maybe others can for some forms of encryption. Or can soon?
For an overview of encryption concepts see encrypting everything and for application of concepts in useful tools, see object encryption on linux and anonymising your traffic with linux.
Making backups
Data backups were traditionally done by commands to archive and compress files to backup, then writing that backup archive to tape. Tape archiving has been replaced by backing up data over the network, to other hard disks, CD's, DVD's and other low-cost removable media.
Archiving and compressing
Linux offers separate tools for gathering groups of files into a single archive and compressing that archive for efficient storage. Oh yuk, "efficient", oh well. It's about using less disk space and reducing transfer times over networks. And comes at a price. It can increase your CPU usage.
tar
You can combine archiving and compressing together by using additional options to the tar (tape archiver) command. Tar can behave differently on different distros. The manual page contains descriptions of the myriad of features that come with tar. The basic operations of tar:
- Create a backup archive:
c - Extract files from an archive:
x - Compare differences between archives:
d - Update files in an archive:
u - Append files:
rorA - Delete files from an existing archive:
d - List contents of an archive:
t
When creating a tar archive, you can add options that compress the resulting archive. With j the archive will be compressed in bzip2 format, and with z in gzip format. For example, tar with bzip2 compression:
$ tar xjvf funnybusiness.tar.bz2 *.txt
You can also use other compression mechanisms like lzop with tar. It is faster, but the compression is less than with bzip2 which is around 10 times slower while only giving twice the amount of compression. You can also set the compression level in the compression commands themselves.
gzip
Gzip compress the size of the given files using Lempel-Ziv coding (LZ77). Whenever possible, each file is replaced by one with the extension .gz. For more on how it works, see https://en.wikipedia.org/wiki/DEFLATE
Compress a file:
$ gzip funnybusiness.txt
Compress all images with a .jpg extension in a directory:
$ gzip *.jpg
Compress all files in a directory:
$ gzip -rv [directory]
Test integrity of a gzip compressed file:
$ gzip -tv funnybusiness.gz
To uncompress a compressed file:
$ gunzip -v funnybusiness.gz
Fastest compression time, least compression:
$ gzip -1 funnybusiness.gz
Slowest compression time, most compression:
$ gzip -9 funnybusiness.gz
bzip2
bzip2 compresses files using the Burrows-Wheeler block sorting text compression algorithm and Huffman coding. Compression is generally considerably better than that achieved by bzip command (LZ77/LZ78-based compressors). Whenever possible, each file is replaced by one with the extension .bz2.
$ bzip2 [filename]
Uncompress:
$ bunzip [filename].bz2
lzop
lzop uses the LZO data compression library for compression services, and its main advantages over gzip are much higher compression and decompression speed (at the cost of some compression ratio). lzop is copyrighted under the terms of the GNU General Public License (GPL). More on http://www.lzop.org/
You will probably have to install it first:
$ sudo apt-get install lzop
Compress:
$ lzop [filename]
Unlike gzip and bzip2, lzop has no separate command for unlzopping. NO UNLZOPPING! Use the d option:
$ lzop -dv [filename].lzo
Backing up files
Data backup is something that everybody should do, but unfortunately, few people do it on a regular basis. You can make a backup of your entire system with rsync or with unison.
rsync
rsync (remote sync), is a remote and local file synchronisation tool. It uses an algorithm that minimises the amount of data copied by only moving the portions of files that have changed. It operates in a way similar to ssh, scp, and cp, for example:
$ rsync -a [directoryname]/ /media/[pathtoexternaldisk]/[directoryname]
The a option is a combination flag. It stands for "archive" and syncs recursively and preserves symbolic links, special and device files, modification times, group, owner, and permissions. Rsync can be used for a lot more in many different ways http://www.thegeekstuff.com/2010/09/rsync-command-examples/.
unison
unison allows for accessing the same set of files from any computer (running Mac OS X, M$ Windows XP, or UNIX/Linux) and keeps these files up-to-date by always maintaining the most recently-modified version of each file during synchronization. The great benefit of using unison to replicate files across different computers (servers) is that your backups are alive http://www.cis.upenn.edu/~bcpierce/unison/.
Traffic monitoring
wireshark
Wireshark lets you capture and interactively browse the traffic running on a computer network and can be used to debug network protocol implementations, examine security problems and inspect network protocol internals. See networking concepts.
Installing wireshark
$ sudo apt-get install wireshark
Choose YES if you want to capture packets as user:
You will also need to allow non-root users to capture packets. For that, follow the procedure described in /usr/share/doc/wireshark-common/README.Debian:
$ sudo adduser user wireshark
Capturing packets
You can launch it and click the name of an interface under Interface List to start capturing packets on that interface:
You can configure advanced features by clicking Capture Options:
As soon as you click Start, you’ll see the packets start to appear in real time. Wireshark captures each packet sent to or from your system. If you’re capturing on a wireless interface and have promiscuous mode enabled in your capture options, you’ll also see other the other packets on the network.
Click the stop capture button near the top left corner of the window when you want to stop capturing traffic.
For examples of its use, see Anonymising your traffic with linux. If there’s nothing interesting on your own network to inspect, Wireshark’s wiki has you covered. The wiki contains a page of sample capture files that you can load and inspect https://wiki.wireshark.org/SampleCaptures. To open a capture file, click Open on the main screen and browse for a file. You can also save your own captures and open them later.
Filtering packets
If you’re trying to inspect something specific, such as the traffic a program sends, it helps to close down all other applications using the network so you can narrow down the traffic. Still, you’ll likely have a large amount of packets to sift through. That’s where filtering come in.
The most basic way to apply a filter is by typing it into the filter box at the top of the window and clicking Apply. For example, type dns and you’ll see only DNS packets.
Another interesting thing you can do is right-click a packet and select Follow TCP, UDP or SSL Stream.
Inspecting packets
Click a packet to select it and you can dig down to view its details. You can also create filters by using the Apply as Filter submenu to create a filter based on it (those ands and ors are boolean algebra):
Configuring sysctl (*)
sysctl is a tool for examining and changing kernel parameters at runtime, a near-necessary tool in the defense from malware.
$ sudo geany /etc/sysctl.conf
For now it is naught more than removing a few comment-out chars and adding a few lines:
#
# /etc/sysctl.conf - Configuration file for setting system variables
# See /etc/sysctl.d/ for additonal system variables
# See sysctl.conf (5) for information.
#

#kernel.domainname = example.com

# Uncomment the following to stop low-level messages on console
#kernel.printk = 3 4 1 3

##############################################################3
# Functions previously found in netbase
#

# Uncomment the next two lines to enable Spoof protection (reverse-path filter)
# Turn on Source Address Verification in all interfaces to
# prevent some spoofing attacks
net.ipv4.conf.default.rp_filter=1
net.ipv4.conf.all.rp_filter=1

# Uncomment the next line to enable TCP/IP SYN cookies
# See http://lwn.net/Articles/277146/
# Note: This may impact IPv6 TCP sessions too
net.ipv4.tcp_syncookies=1

# Uncomment the next line to enable packet forwarding for IPv4
#net.ipv4.ip_forward=1

# Uncomment the next line to enable packet forwarding for IPv6
#  Enabling this option disables Stateless Address Autoconfiguration
#  based on Router Advertisements for this host
#net.ipv6.conf.all.forwarding=1

###################################################################
# Additional settings - these settings can improve the network
# security of the host and prevent against some network attacks
# including spoofing attacks and man in the middle attacks through
# redirection. Some network environments, however, require that these
# settings are disabled so review and enable them as needed.
#
# Do not accept ICMP redirects (prevent MITM attacks)
net.ipv4.conf.all.accept_redirects = 0
net.ipv4.conf.default.accept_redirects = 0
net.ipv6.conf.all.accept_redirects = 0
# _or_
# Accept ICMP redirects only for gateways listed in our default
# gateway list (enabled by default)
# net.ipv4.conf.all.secure_redirects = 1
#
# Do not send ICMP redirects (we are not a router)
net.ipv4.conf.all.send_redirects = 0
#
# Do not accept IP source route packets (we are not a router)
net.ipv4.conf.all.accept_source_route = 0
net.ipv4.conf.default.accept_source_route = 0
net.ipv6.conf.all.accept_source_route = 0
#
# Log Martian Packets
net.ipv4.conf.all.log_martians = 1
net.ipv4.conf.default.log_martians = 1
For more see resources below.
Auditing your setup
Tiger
Tiger supports multiple UNIX platforms it is free and provided under a GPL license. Tiger is used as a security audit and is useful both for system analysis (security auditing) and for real-time, host-based intrusion detection. More on its history and resurrection here http://digital-era.net/setting-up-and-using-tiger-for-security-audit-and-intrusion-detection/.
It consists of Bourne Shell scripts, C code and data files used for checking for security problems on a UNIX system. It scans system configuration files, file systems, and user configuration files for possible security problems and creates a report on issues found.
Installing tiger
$ sudo apt-get install tiger
Configuring tiger
- You can mess with the tiger variables in the
/etc/tiger/tigerrcconfiguration file. For each available module there is a corresponding variable in the file that determines whether the module is run. A variable can be set equal to Y to run, or N to skip. Other configuration variables will modify the behaviour of some modules, and can be adjusted based on the operating system. - The
/etc/tiger/tiger.ignoreconfiguration file defines the set of messages that will not be presented in the report even if any of the modules generate them. All entries (per line) are used as extended regular expressions that are compared against each message (mind the overhead which grows with the size of the file).
Using tiger
The command tig‐exp(8) can be used to obtain explanations of the problems reported by tiger. Doing a first run can be shocking (not boring). For all listed fixes below the explanations are included.
Checking passwd files:
--WARN-- [pass014w] Login (name) is disabled, but has a valid shell.
The listed login ID is disabled in some manner (‘*’ in passwd field, etc), but the login shell for the login ID is a valid shell (from /etc/shells or the system equivalent). A valid shell can potentially enable the login ID to continue to be used. An attacker can hide programs within these shells by simply ‘su’ing into these accounts.
Debian comes with some predefined users (https://www.debian.org/doc/manuals/securing-debian-howto/ch12.en.html#s-faq-os-users) listed in /etc/passwd:
- The default behavior is that UID’s from 0 to 99 are reserved in Debian (https://www.debian.org/doc/debian-policy/) to ease the installation of some services that require that they run under an appropriate user/UID. If you do not intend to install these services, you can safely remove those users who do not own any files in your system and do not run any services.
- UID’s from 100 to 999 are created by packages on install (and deleted when the package is purged). Some of the accounts in this range are users linked to programs you’re running. In general, it is better to prune your system via the associated packages than try to manage them manually.
- Manually created users end up with a UID just above 1000 (unless you manually specified the uid).
For example www-data in most cases, does not need a shell, but some cgi could need it. Historically all users under UID 99 had a /bin/sh as login shell, and the ones found and listed here by tiger are historic or legacy users, for all “modern” linux services already come preconfigured to /bin/false. For those not preconfigured, you can dig into your system to know what each user does there:
- Do a
topor aps auxand check the users; if there’s a process started by “nobody” user you can’t delete it. - Also check crontab and cron.d; if you delete a user required for starting a cron job, that job will never work again.
- Another useful check is to check the
/etc/shadowfile and see which second fields are X (crossed out) for which accounts.
If you conclude a process shouldn’t be there, then stop the daemons, uninstall its packages, and then delete the users. If you are unsure about deleting a user used as administrative user you can set its shell to /bin/false or /sbin/nologin (or something else that doesn’t exist). The user will remain there but nobody will get a shell from it.
Always leave the shell for your user and root user. Whatever you do, do NOT remove or change the shell for root.
--WARN-- [pass015w] Login ID sync does not have a valid shell (/bin/sync)
The listed login ID does not have a valid login program or shell. Usually these Shells are defined in /etc/shells.
This is a special case in which there is not a valid shell for sync. /bin/sync is a valid file with a valid purpose. You can ignore.
--WARN-- [pass006w] Integrity of password files questionable (/usr/sbin/pwck r).
The password files have integrity issues as found by pwck -r http://www.sanfoundry.com/pwck-command-usage/. This can lead to looping of password manipulation programs and to authentication or login issues if not corrected. Install the relevant packages or create the directory and set permissions for only limited access.
$ sudo /usr/sbin/pwck -r
Checking user accounts:
--WARN-- [acc022w] Login ID nobody home directory (/nonexistent) is not accessible.
But without a valid home directory, the user could end up with / as the home directory. You can disable his shell in /etc/passwd by setting it to /bin/false or /sbin/nologin and ignore the resulting error, or you can create the directory, change its ownership and persmissions.
$ sudo mkdir /nonexistent
$ chown nobody:nobody /nonexistent
$ chmod 400 /nonexistent
Checking cron entries:
Cron allows users to submit jobs for the system to do at a particular, possibly recurring time. It can be very useful, but also has a very real potential for abuse by either users or system crackers. Users can be restricted to use cron by creating a /etc/cron.allow (holding only system administrators) or a /etc/cron.deny file (listing which users are not allowed access).
--WARN-- [cron004w] Root crontab does not exist
Not a problem. Ignore.
--WARN-- [cron005w] Use of cron is not restricted
For standard Debian systems, all users may use this command. Use the fix on Linux/UNIX Restricting at/cron Usage To Authorized Users here http://www.cyberciti.biz/faq/howto-restrict-at-cron-command-to-authorized-users/ or ignore.
Checking services:
--WARN-- [inet003w] The port for service (x) is also assigned to service (y)
A program with a port assigned to TCP and a second entry for the same port with UDP. These service ports are defined in /etc/services and double entries is quite normal (it is about synonyms). You can just ignore or review these and make sure they are all synonyms and you don’t have two very different programs accessing the same port. Check the /etc/services file against the file the official assigning authority provides. Review open ports and if any, either uninstall or disable services you don’t use or want. Be careful.
Checking system file permissions:
--ALERT-- [perm023a] /bin/su is setuid to `root'
The explanation of tiger reads: The indicated file has the setuid bit set, but it should not have it. This should be changed by using chmod u-s file where ‘file’ is the indicated file. The system should be checked for signs of intrusion.
Restricting the su command to superuser only in Linux (http://www.debianadmin.com/howto-restrict-su-command-to-superuser-only-in-linux.html) can affect some apps and packages that link to suid rooted su binary. For example, on debian it leads to an authentication failure when ‘su’ing in console or terminal of a user. My recommendation is to ignore this and those like it. You also don’t, for example, want to remove the suid bit from /usr/bin/passwd, for if you do no user will be able to change password.
Everything from /bin/, /sbin/, /usr/bin and /usr/sbin should be safe, they are part of the base OS. The most common reason for any program to be setuid is to enable it to act as root (setuid root) for access to hardware, secure storage, devices …
AND any vulnerability in a program that is set up as setuid root can get an attacker root-level access to your box, by running the command as a regular user (privilege escalation). If you can avoid it (or doing so is inconvenient or opens up other holes or cans of worms and authentication failures), you don’t want things to run setuid root.
If you are mounting shares that have setuid root files on them that were created by a user on another box, they can be used to own your box. There are options to mount such shares no-setuid – so the setuid bit on files will be ignored on that filesystem.
In particular, you don’t want files that are setuid to be writable by non-root users, otherwise someone could replace them with malicious code that will then be executed as root.
If you find setuid binaries in non-binary filesystem locations (especially in for example /tmp or anywhere under /var) whose origins are unknown you may have been hacked. A setuid enabled binary for root under /home/username/crack smells definitely fishy.
You can find all files (in /usr/local/bin) with S_ISUID bit set with:
$ sudo find /usr/local/bin -perm +4000
And all files with S_ISUID and that are writable by owner with:
$ sudo find /usr/local/bin -perm -4200
Checking network configuration:
--WARN-- [lin017w] The system is not configured to log suspicious (martian) packets
Fix with:
$ sudo sysctl w net.ipv4.conf.all.log_martians=1
$ sudo sysctl w net.ipv4.conf.default.log_martians=1
Yes, yes, I had forgotten those default versions. Also corrected in sysctl (*).
Resources
RandomSource
- Dual EC DRBG https://projectbullrun.org/dual-ec/
General
- Linux security http://www.linuxsecurity.com/
Debian
- Security information https://www.debian.org/security/
- Securing Debian Manual https://www.debian.org/doc/manuals/securing-debian-howto/index.en.html
Ubuntu
- Ubuntu security notices http://www.ubuntu.com/usn/
- Basic Ubuntu Security Guide, Desktop Edition https://wiki.ubuntu.com/BasicSecurity
Mint
Sysctl
- Linux Kernel /etc/sysctl.conf Security Hardening http://www.cyberciti.biz/faq/linux-kernel-etcsysctl-conf-security-hardening/
- Tuning the Kernel http://cromwell-intl.com/cybersecurity/stack-hardening.html
Related
- Installing linux
- Linux applications
- Kinky linux command-line
- Object encryption on linux
- Anonymising your traffic with linux
- Clean up all the things
- Shell scripting

