Trolling
From Gender and Tech Resources
The literature suggests that, compared to face-to-face, the increased incidence of flaming when using computer-mediated communication is due to reductions in the transfer of social cues, which decrease individuals' concern for social evaluation and fear of social sanctions or reprisals. When social identity and ingroup status are salient, computer mediation can decrease flaming because individuals focus their attention on the social context (and associated norms) rather than themselves. ~ Norman Johnson
And it's not only your next-door frustrated citizen taking it out on you or your local prankster (alias trickster alias controlled fool) making you think again with harmless jokes, it's also government agents trained to troll you [1]. For more on that, see Psychological warfare. This page is on minor and little and teensy-weensy petty tyrants, and teensy-weensy worthy adversaries.
Contents
History
While the term “troll” has become wildly muddied, it did have to come from somewhere … [2][3]
Defense from trolling
You can not control whether you will become a target, and you can decide if you will be a victim. Knowing that the troll’s goal is to elicit a reaction instead of a response, you can initially use the famous “Don’t Feed The Trolls!” defense, but if maintained this gives the trolls even more power as it gives them the power to silence you.
- How to deal with trolls
- The Japanese martial art of aikido affords a framework for understanding argument as harmonization rather than confrontation. Two movements, circling away ("tenkan") and entering in ("irimi"), suggest tactics for arguing with adversaries. The ethical imperative of aikido involves protecting one's adversary from harm, using the least force necessary, and, when possible, transforming aggression into cooperation.
- Perhaps add a dash of controlled folly, depending.
My response depends. On how busy I am with other things that I enjoy more, on a quick profiling scan of the attackers ... and sometimes I troll back for the lulz of it. Actually. :D
Subvertising
Progressives are quite adept at the critique of this ‘manufacture of consent,’ but we need to learn how to construct dissent ... as well. We need to acknowledge that politics – even our own politics – is about persuasion, and that one of the most effective ways to persuade people, and effect change, is to tap into their dreams. If progressives are going to take politics and power seriously, we need to learn to use spectacle not grudgingly but enthusiastically and free of guilt. We need to make spectacle our own. ~ Stephen Duncombe [4].
For example, The Art & Science of Billboard Improvement http://www.billboardliberation.com/guidebook.html
Using bots to troll on twitter
The purpose of this twitterbot development is playful co-development of laughriot bots for the sake of unserious serious mirroring of arms race patterns. Upside down, inside out, and vice versa.
Install Node.js
Node.js http://nodejs.org/ is a platform built on Chrome’s JavaScript runtime http://code.google.com/p/v8/ for building scalable network applications. Node.js uses an event-driven, non-blocking I/O model, making it very useful for data-intensive real-time applications that run across distributed devices. It is also very popular, meaning, many useful libraries and apps already exist (like twit, see below) and can be built on. Node.js comes with a package manager called npm that makes installing packages, or modules as they are more properly called, straightforward. Windows installer, Macinstosh installer, binaries and source code are available here http://nodejs.org/download/ . You can install from source here https://github.com/joyent/node/wiki/Installation . On Linux you can also use a package manager to install node https://github.com/joyent/node/wiki/Installing-Node.js-via-package-manager .
Setup with Debian (as root):
# apt-get install curl lsb-release
# curl -sL https://deb.nodesource.com/setup | bash -
# apt-get install nodejs
Open a user terminal and test your set-up by creating a file called hello.js. Open it and add this line:
console.log("Hello World!");
Save and at the user command prompt type:
$ node hello
If you received a “Hello World!” in your terminal, it wurks.
Create a Test Twitter account
Using bots you run the risk of having the associated twitter account suspended. Until your bot is neatly within the rules and best practices box https://support.twitter.com/articles/76915-automation-rules-and-best-practices, use a test account that states it is for developing bot(s). Twitter doesn’t allow you to register multiple twitter accounts on the same email address, so create a brand spanking new email address for the new account. Confirm email address and ask some people to follow the account with theirs and follow their accounts back.
Register an application with the Twitter API
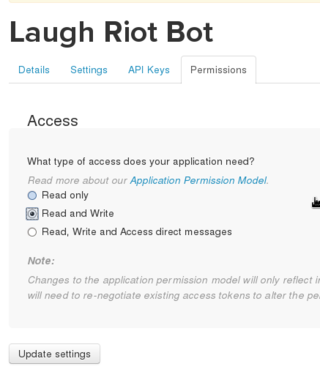
In computer programming, an application programming interface (API) specifies how some software components can interact with each other. To have access to the twitter API, go to twitter developers https://dev.twitter.com/ to register an application for your twitter test bot account https://apps.twitter.com/app/new. Fill in the required fields: name, description, website. None of it really matters at all to your actual application. Submit. Next you’ll see a screen with a “Details” tab. Click on the “Permissions” tab and choose “Read and Write“, then hit the update button at the bottom. It may be that you get a message that you can only set an app to read and write if you have a mobile number set up in your twitter account https://support.twitter.com/articles/110250-adding-your-mobile-number-to-your-account-via-web
Create an access token
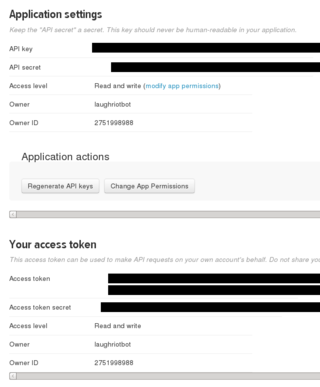
Then go to the API Keys tab, and at the bottom click “create my access token“. Wait a minute and reload the page. Then there should be an “access token” and “access token secret“, both long strings of letters and numbers. With that we have a Twitter user account and a registered application. We can make API calls either as a user or as an application. The API key and API secret to make API calls on behalf of the application, and your access token and access token secret to make API calls on behalf of your user account. For more see "how to get my API key" https://dev.twitter.com/discussions/631.
Develop bot functionality using what is called "piecemeal growth". For now seek bots with basic functionalities to test what wurks and what not:
Retweeting mined tweets
The first bot is based on this examplebot https://github.com/dariusk/examplebot with only minor adaptations. It mines public tweets for by you desired gold nuggets and retweets the latest nugget.
Download bot files: Create a directory for your bot. Download the files from here https://github.com/dariusk/examplebot (the download link is on the righthand side in the navbar). Unzip and extract or copy the files to the directory you created.
Install dependencies: Now install a Twitter API library so we can actually make API calls in our twitterbot project. Enters twit https://github.com/ttezel/twit , a Twitter API Client for node that supports both the REST API v1.1 https://dev.twitter.com/docs/api/1.1 & Streaming APIs https://dev.twitter.com/docs/streaming-apis (Note: Proper use and care of the Streaming API https://dev.twitter.com/discussions/14935). Using a terminal go to the directory with the files and type the npm install command at the user prompt:
:~/twitterbot$ npm install twit
Configure bot: Open the file config.js and add your API key (previously known as consumer key), API secret (previously known as consumer secret), access token and access token secret strings in their respective intended locations instead of the three dots.
module.exports = {
consumer_key: '...'
, consumer_secret: '...'
, access_token: '...'
, access_token_secret: '...'
}
In bot.js you can twiddle the GET search/tweets parameters to use your hashtag instead of #mediaarts. You can use any search term as you would enter it in the twitter search box.
// This is the URL of a search for the latest tweets on the '#mediaarts' hashtag.
var mediaArtsSearch = {q: "#mediaarts", count: 10, result_type: "recent"};
My mining looks like this (if you change the variable name you also have to change it in the GET search/tweets):
// This is the URL of a search for the latest tweets on the search term.
var twitterSearchTerm = {q: "#lulzwarfare OR #laughriot OR #TrollYourGovernment OR #freeanons OR #lulz", count: 5, result_type: "recent"};

// This function finds the latest tweet on the search term, and retweets it.
function retweetLatest() {
  T.get('search/tweets', twitterSearchTerm, function (error, data) {
Timing is at the bottom:
// Try to retweet something as soon as we run the program...
retweetLatest();
// ...and then every hour after that. Time here is in milliseconds, so
// 1000 ms = 1 second, 1 sec * 60 = 1 min, 1 min * 60 = 1 hour --> 1000 * 60 * 60
setInterval(retweetLatest, 1000 * 60 * 60);
Test bot: Start your bot on the prompt in your bot directory (where the bot.js resides):
:~/twitterbot$ node bot
Retweeting tweets from a twitter/list
This bot retweets the latest tweets from a twitter list timeline.
Download bot files: Create a directory for your bot. Download the files from here https://github.com/dariusk/dariusbots (the download link is on the righthand side in the navbar). Unzip and extract or copy the files to the directory you created.
Install dependencies: Next is installing a Twitter API library so we can actually make API calls in our twitterbot project. Enters twit https://github.com/ttezel/twit , a Twitter API Client for node that supports both the REST API v1.1 https://dev.twitter.com/docs/api/1.1 & Streaming APIs https://dev.twitter.com/docs/streaming-apis (Note: Proper use and care of the Streaming API https://dev.twitter.com/discussions/14935).
This bot has a number of other dependencies, of which one is grunt http://gruntjs.com/. The grunt file that is in the download is helpful for installing all necessary libraries in node-modules. Using a terminal go to the directory with the files and type the npm install command at the user prompt:
:~/twitterbot$ npm install
Configure bot: Open the file config.js and add your API key (previously known as consumer key), API secret (previously known as consumer secret), access token and access token secret strings that you got when you set up for bots using node, in their respective intended locations instead of the three dots.
module.exports = {
consumer_key: '...'
, consumer_secret: '...'
, access_token: '...'
, access_token_secret: '...'
}
In index.js you can change parameters:
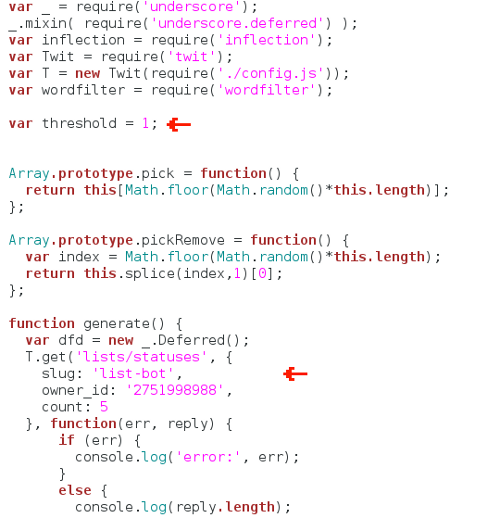
The GET lists/statuses https://dev.twitter.com/docs/api/1.1/get/lists/statuses returns a timeline of tweets authored by members of the specified list. You can identify a list by its numerical id or it’s slug. The slug in this case is the last bit of the url of a list.
And when using a slug instead of a list_id I also have to specify the list owner using the owner_id or owner_screen_name parameters. Retweets by members of the list are included. You can use the include_rts=false parameter to omit those retweets.
Now count and threshold: If you set threshold to 0 and count to 5, the bot will retweet the last 5 tweets minus tweets that are filtered out by the wordfilter. If you set threshold to 1 and count to 5, it will not tweet any tweet that has not been at least once retweeted OR favorited. The choice for a threshold of 1 makes the number of retweets per event more variable. Anyway, play with those but keep the twitter rate-limits in mind https://dev.twitter.com/docs/rate-limiting/1.1 , especially if you have other bots using the same token keys.
Now on that wordfilter functionality. Have a look in the node_modules > wordfilter > lib > badwords.json file. Darius wrote:
I leave your levels of self-censorship to you. I have my own to deal with.
Then at the bottom, where it all comes together, (interval) time is in milliseconds: 1000 ms = 1 second, 1 sec * 60 = 1 min, 1 min * 60 = 30 minutes –> 1000 * 60 * 30.
// Tweet every 30 minutes
setInterval(function () {
  try {
    generate();
  }
  catch (e) {
    console.log(e);
  }
}, 1000 * 60 * 30);

// Tweet once on initialization
generate();
Test bot: Start your bot on the prompt in your bot directory (where the index.js resides):
:~/twitterbot$ node index
Update with media
On my piecemeal growth path of developing bots for the sake of unserious seriousness (controlled folly), I wanted to regularly promote our “lulzwarfare” product(s) with for commercial settings usual marketing slogans and examples of lulz as eye catching illustration on twitter. Of course, none of the twitter libraries on node.js I tried got update_with_media to work. The code ran fine and reported success but the tweets went into some mysterious void. Debuggers! After two days of banging my head, I not only found I wasn’t the only one banging my head, I also found a workaround https://gist.github.com/adaline/7363853 . As a result this bot has an additional file in its top directory, and no dependency on twit, but on request https://github.com/mikeal/request .
Download bot files: Create a directory for your bot. Download the files from here https://github.com/LilithLela/updatewithmediabot . Unzip and extract or copy the files to the directory you created.
Install dependencies: Now install a Twitter API library so you can actually make API calls. Enters request https://github.com/mikeal/request , a Simplified HTTP request client. Using a terminal go to the directory with the files and type the npm install command at the user prompt:
:~/twitterbot$ npm install request
Configure bot: Open the bot.js file and add your API key (previously known as consumer key), API secret (previously known as consumer secret), (access) token and (access) token secret strings you created when you set up for bots using node, in their respective intended locations instead of the three dots.
module.exports = {
  consumer_key: '...',
  consumer_secret: '...',
  token: '...',
  token_secret: '...'
}
In bot.js you will also find a function that picks a slogan at random from a data structure holding a bunch of the most common marketing & sales slogans. You can change the quotes. The function tests for the number of quotes in it, so feel absolutely free to have more or less quotes. It will not cause the bot to fail. Not that.
The “\” in front of some characters is necessary because those characters are “magic”, meaning they have a special meaning. To not have these codes be interpreted but taken as is, we can “escape” them from their prison of special meanings by putting a “\” in front of the character (without those \”\”).
function getRandSlogan() {
  slogans = [
  'Things work better with #lulzwarfare',
  '#lulzwarfare is an investment in good performance',
  '#lulzwarfare, optimized for speed',
  'Fill It To The Rim With #lulzwarfare.',
  'You\'re Never Alone with a #lulzwarfare.',
  'Because I\'m Worth #lulzwarfare.',
  'Would You Give Someone Your Last #lulzwarfare?',
  'Let The #Lulzwarfare Take The Strain.',
  ];
  var slogan = getRandIndex(slogans);
  return slogan;
}
To show the health and vitality of our product(s), I am adding examples of lulz as eye catching illustration. Those are placed in the directory next to the bot files, and named in the getRandMeme() function.
I may have gone a bit overboard in mine. I have 100 images. You do not have to use a hundred images, or to use numbered pictures. As long as the image names in the directory match the names in getRanMeme(), it will work.
// Get a random meme image
function getRandMeme() {
  memes = [
  '1.jpg',
  '2.jpg',
  '3.jpg',
  '100.jpg'
  ];
  var meme = getRandIndex(memes);
  return meme;
}
At the bottom of the bot.js file you will find timing. It does it’s thing when starting and then does it again 2 hours later, and again, for as long as the bot runs.
produceLulz();

// Time here is in milliseconds: 1000 ms = 1 second,
// 1 sec * 60 = 1 min, 1 min * 60 = 2 hours --> 1000 * 60 * 120
setInterval(produceLulz, 1000 * 60 * 120);
Test bot: Start your bot on the prompt in your bot directory:
:~/twitterbot$ node bot
Bot location
If you have it on your local machine and it is not connected, neither is the bot. To have it run 24/7, relocate it to a server.
For the current purpose of playful co-development of laughriot and lulzwarfare bots, having the code available via a 24/7 publicly accessible version control system, and the Twitter account with a short term memory containing results of the past experimental bots, and these wikipages (to make stealing with pre-given explicit consent easier), both being available 24/7 too, is enough.
Work flow
If you only wish to run bot(s) with some minor adaptations, you do not need a work flow tool. But if you wish to co-develop GNU licensed twitter bots, I recommend setting up a work flow. I chose to go for a path of least resistance: node.js is on github, so I have set up for git and github.
And since I am preparing to make GNU licensed twitter bots that can be run from local machines, and of which the code can be inspected and installed, adapted, and used by other people …
Install and configure git
$ sudo apt-get install git
The first thing after installing Git is to set user name and e-mail address. Git commit needs this information:
$ git config --global user.name "YourName"
$ git config --global user.name youremailaddress
Note: It is also possible to set other global preferences related to your programming environment, like preferred text editor and diff tool. You can also choose to do that later.
Set up a github account
Set up a github account https://help.github.com/articles/signing-up-for-a-new-github-account/ (put username and password in keepassx or other password file or a scrap-of-paper-soon-to-be-lost).
It is possible to use a credential helper https://help.github.com/articles/caching-your-github-password-in-git so Git will remember my GitHub username and password every time it talks to GitHub. But maybe best is setting up for two-factor authentication https://help.github.com/articles/about-two-factor-authentication and creating a personal access token https://help.github.com/articles/creating-an-access-token-for-command-line-use to use instead of a GitHub password.
Getting started with git
You can get a git project using two main approaches http://git-scm.com/book/en/Git-Basics-Getting-a-Git-Repository: The first takes an existing project or directory and imports it into Git. The second clones an existing Git repository from another server. There are several ways to clone repositories available on GitHub https://help.github.com/articles/which-remote-url-should-i-use. Cloning with HTTPS is recommended: The https:// clone URLs are available on all repositories, public and private, and work everywhere, even from behind a firewall or proxy. But not when using tor.
When you git fetch, git pull, or git push to the remote repository using HTTPS, you’ll be asked for your GitHub username and password (in keepassx or other password file or on that scrap-of-paper-that-is-already-lost) unless you set up a credential helper.
Resources
Books
- Games people play http://www.ericberne.com/games-people-play/
- Fairy Tales and Script Drama Analysis (pdf) http://www.karpmandramatriangle.com/pdf/DramaTriangle.pdf
- The New Drama Triangles – Karpman drama triangle (pdf) http://karpmandramatriangle.com/pdf/thenewdramatriangles.pdf
Operations
Zero trollerance
- ZeroTrollerance Step 1: Zero Denial http://zerotrollerance.guru/step-1.php
- ZeroTrollerance Step 2: Zero Internet http://zerotrollerance.guru/step-2.php
- ZeroTrollerance Step 3: Zero Anger http://zerotrollerance.guru/step-3.php
- ZeroTrollerance Step 4: Zero Fear http://zerotrollerance.guru/step-4.php
- ZeroTrollerance Step 5: Zero Hate http://zerotrollerance.guru/step-5.php
- ZeroTrollerance Step 6: Zero Troll http://zerotrollerance.guru/step-6.php
The Crocels Trolling Academy
- Building bridges for a safe and sociable Internet http://www.trollingacademy.org/category/learning-resources/the-trolling-guide-and-unwritten-manual/
- Trollers’ Debatabase http://www.trollingacademy.org/category/learning-resources/debatabase/
Immunisation by immersion
- Verbal Aikido http://www.verbal-aikido.com/
Inspirational
- Encyclopedia Dramatica encyclopediadramatica[dot]se
- The Official Internet Butthurt Complaint Form http://www.pophangover.com/4641/the-official-internet-butthurt-complaint-form/
- Destructables http://destructables.org/
Related
- Installing Bots Against Trolls And Swarming Together
- Psychological warfare
- Roleplay
- Wordsmithing
- Elicitation
References
- ↑ How Covert Agents Infiltrate the Internet to Manipulate, Deceive, and Destroy Reputations https://firstlook.org/theintercept/2014/02/24/jtrig-manipulation/
- ↑ The Trolls Among Us http://www.nytimes.com/2008/08/03/magazine/03trolls-t.html
- ↑ A brief history of trolls http://www.dailydot.com/opinion/phillips-brief-history-of-trolls/
- ↑ Destructables http://destructables.org/


