Difference between revisions of "Deep web"
From Gender and Tech Resources
(Created page with "== What is the deep web??== The deep web refers to all the information that is in the world wide we but is not indexed so it is not possible to access it using search engines...") |
(→Adding data to the deep web) |
||
| Line 81: | Line 81: | ||
The second option is using zeronet.io. This tool allows you to publish open, free and uncensored blogs and it uses the Bitcoin cryptography and the BitTorrent network. | The second option is using zeronet.io. This tool allows you to publish open, free and uncensored blogs and it uses the Bitcoin cryptography and the BitTorrent network. | ||
| − | + | Although you can use this tool in different operating systems the option we recommend is '''zeronet + TAILS''' (https://tails.boum.org/) because it represents the safest form, however it requires that you dedicate a little more time to its configuration since you must know how to enable ports in the internet modem. | |
[[File:zeronet_logo.png|120px|none|alt=zeronet.io|ZeroNet]] | [[File:zeronet_logo.png|120px|none|alt=zeronet.io|ZeroNet]] | ||
| − | + | What do you need? | |
| − | + | One USB with TAILS and persistencia activated. | |
| − | + | Enable the port 15441 of your modem | |
| − | + | 1) You have login to a TAILS session using persistence and advanced settings to access the ''root'' terminal. | |
| − | + | 2) In the terminal you need to write the following commands: | |
| − | + | To update and install the required dependencies: | |
| − | + | ||
| − | + | ||
$ sudo apt-get update | $ sudo apt-get update | ||
| Line 103: | Line 101: | ||
$ sudo apt-get install python-msgpack python-gevent | $ sudo apt-get install python-msgpack python-gevent | ||
| − | + | For downloading zeronet: | |
| + | |||
$ wget https://github.com/HelloZeroNet/ZeroNet/archive/master.tar.gz | $ wget https://github.com/HelloZeroNet/ZeroNet/archive/master.tar.gz | ||
| − | + | ||
| + | To unzip the downloaded file: | ||
| + | |||
$ tar xvpfz master.tar.gz | $ tar xvpfz master.tar.gz | ||
| − | + | ||
| + | To enter the file: | ||
| + | |||
$ cd ZeroNet-master | $ cd ZeroNet-master | ||
| − | |||
| − | |||
| − | + | For starting: | |
| − | + | $ python zeronet.py | |
| + | |||
| + | If this option does not work you need to check your IP | ||
$ sudo ifconfig | $ sudo ifconfig | ||
| − | + | This command will tell you what your internet address (inet addr), for example in the image it is 10.14.241.166 | |
[[File:ifconfig.png|400px|center|alt=Comando ifconfig]] | [[File:ifconfig.png|400px|center|alt=Comando ifconfig]] | ||
$ python zeronet.py --proxy 127.0.0.1:9050 --tor disable --ui_ip inet_addr | $ python zeronet.py --proxy 127.0.0.1:9050 --tor disable --ui_ip inet_addr | ||
| − | + | In the previous command you must replace inet_addr with the one that corresponds to your computer | |
| − | + | ||
| − | + | ||
| − | + | With those steps you will have started the services of zeronet | |
| − | + | 3) In the browser '''TOR''' you need to open the ptions of '''Configuration''' and select ''Advanced'' where you will find the tab '''Network''' and in the first point you need to go to '''Connection''' '''Options''' and add in '''No proxi''' 127.0.0.1 or your own inet_addr | |
| + | [[File:Proxy_conf_tor.png|400px|center|alt=Configuration options for the TOR browser]] | ||
| − | + | After you can open/ | |
http://inet_addr:43110/ | http://inet_addr:43110/ | ||
| − | + | for instance: | |
http://127.0.0.1:43110 | http://127.0.0.1:43110 | ||
| − | + | And you will find the graphical interface | |
[[File:zeronet.png|400px]] | [[File:zeronet.png|400px]] | ||
| − | + | To create a new blog you only need to activate '''Zero blog''' and use the tool for cloning. | |
[[File:Zeronet2.png|400px]] | [[File:Zeronet2.png|400px]] | ||
| − | ''' | + | '''Note:''' |
| − | + | You will only be able to upload information to the network zeronet if your port 15441 is enabled | |
| − | + | You can see more information about set up and configuration here [https://github.com/HelloZeroNet/ZeroNet ZeroNet] | |
==Referencias== | ==Referencias== | ||
Revision as of 15:32, 1 February 2017
Contents
What is the deep web??
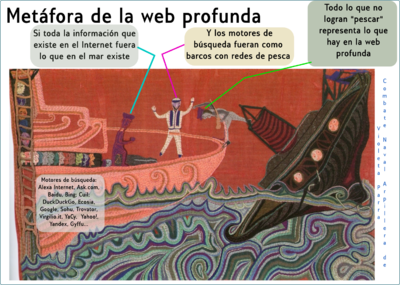
The deep web refers to all the information that is in the world wide we but is not indexed so it is not possible to access it using search engines like Google [1]. Web indexing (or Internet indexing) refers to various methods for indexing the contents of a website or of the Internet as a whole. Individual websites or intranets may use a back-of-the-book index, while search engines usually use keywords and metadata to provide a more useful vocabulary for Internet or onsite searching. With the increase in the number of periodicals that have articles online, web indexing is also becoming important for periodical websites [2]
According to the wikipedia "The portion of the web that is indexed by standard search engines is known as the surface web. As of 2001, the deep web was several orders of magnitude larger than the surface web. An analogy of an iceberg used by Denis Shestakov represents the division between surface web and deep web respectively: It is impossible to measure, and harsh to put estimates on, the size of the deep web because the majority of the information is hidden or locked inside databases. Early estimates suggested that the deep web is 400 to 550 times larger than the surface web. However, since more information and sites are always being added, it can be assumed that the deep web is growing exponentially at a rate that cannot be quantified.”
A common confusions is to mix up the deep web and the dark web. Latter corresponds to a part of the deep web, which besides not being indexed has been hidden using methods such as masking IP and/or requiring special permissions or the use of specific software to access it [3].
But if it is not indexed, how do we access it? Below we describe two ways you can immerse yourself in the deep web.
One of the easiest ways is to use the hidden service protocol TOR [4] that operates within the anonymous distributed network of TOR [5].
Considering the wide variety of users and type of information that you can find inside the deep web, it is initially easier and safer to access it using the TOR browser Cite error: Closing </ref> missing for <ref> tag.
Maybe you can ask yourself if it is not indexed where to start?
Case A
You get an .onion address. Those are “.onion is a special-use top level domain suffix designating an anonymous hidden service reachable via the Tor network. Such addresses are not actual DNS names, and the .onion TLD is not in the Internet DNS root, but with the appropriate proxy software installed, Internet programs such as web browsers can access sites with .onion addresses by sending the request through the network of Tor servers. The purpose of using such a system is to make both the information provider and the person accessing the information more difficult to trace, whether by one another, by an intermediate network host, or by an outsider [6].
For instance, you receive:
http://duskgytldkxiuqc6.onion
you need to change the .onion for something like:
.onion.to
.onion.city
.onion.cab
or any other domain made available by the network of volunteers of TOR2web [7].
and you need to open it up in the browser TOR.
Case B
You want to look for a page.
You can begin in: http://deepweb.pw/
This page could be opened in any browser but only using TOR browser you will be able to access .onion pages.
There you can find interesting sites like the Hidden wiki.
You can also look for information here:
https://ahmia.fi/search/
Or if you are interested in websites about leaks:
https://en.wikipedia.org/wiki/GlobaLeaks#Implementations
Other possible search places:
http://3g2upl4pq6kufc4m.onion/
https://www.reddit.com//r/onions
You should consider that the availability of information in many cases is temporary, so you will need to spend considerable time to get used to the deep web and search more fruitfully. Also the language can be a limitation and before entering forums remember that they generally use specific jargon[8].
Case C
You can also use the hidden services of Riseup
https://help.riseup.net/en/tor
Adding data to the deep web
Well now you surf the web deep but how do you add information?
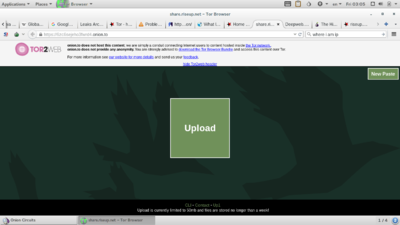
If you need to add a file you can use the services Share of Riseup that let you upload a file up to 50mb for no more than a week. You can find the .onion.to league at: https://help.riseup.net/en/tor
The second option is using zeronet.io. This tool allows you to publish open, free and uncensored blogs and it uses the Bitcoin cryptography and the BitTorrent network.
Although you can use this tool in different operating systems the option we recommend is zeronet + TAILS (https://tails.boum.org/) because it represents the safest form, however it requires that you dedicate a little more time to its configuration since you must know how to enable ports in the internet modem.
What do you need?
One USB with TAILS and persistencia activated.
Enable the port 15441 of your modem
1) You have login to a TAILS session using persistence and advanced settings to access the root terminal.
2) In the terminal you need to write the following commands:
To update and install the required dependencies:
$ sudo apt-get update
$ sudo apt-get upgrade
$ sudo apt-get install python-msgpack python-gevent
For downloading zeronet:
$ wget https://github.com/HelloZeroNet/ZeroNet/archive/master.tar.gz
To unzip the downloaded file:
$ tar xvpfz master.tar.gz
To enter the file:
$ cd ZeroNet-master
For starting:
$ python zeronet.py
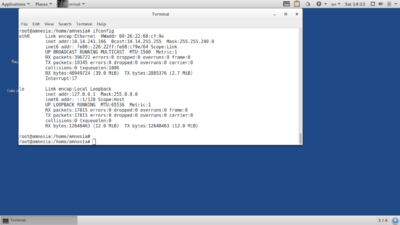
If this option does not work you need to check your IP
$ sudo ifconfig
This command will tell you what your internet address (inet addr), for example in the image it is 10.14.241.166
$ python zeronet.py --proxy 127.0.0.1:9050 --tor disable --ui_ip inet_addr
In the previous command you must replace inet_addr with the one that corresponds to your computer
With those steps you will have started the services of zeronet
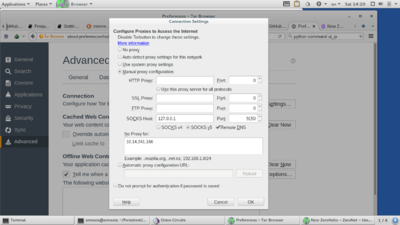
3) In the browser TOR you need to open the ptions of Configuration and select Advanced where you will find the tab Network and in the first point you need to go to Connection Options and add in No proxi 127.0.0.1 or your own inet_addr
After you can open/
http://inet_addr:43110/
for instance:
http://127.0.0.1:43110
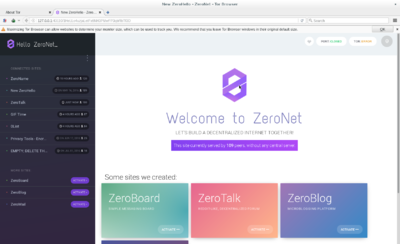
And you will find the graphical interface
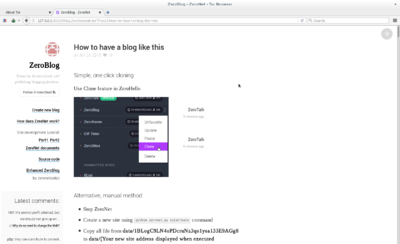
To create a new blog you only need to activate Zero blog and use the tool for cloning.
Note:
You will only be able to upload information to the network zeronet if your port 15441 is enabled You can see more information about set up and configuration here ZeroNet
Referencias
- ↑ https://en.wikipedia.org/wiki/Deep_web
- ↑ https://en.wikipedia.org/wiki/Web_indexing
- ↑ https://en.wikipedia.org/wiki/Dark_web
- ↑ https://www.torproject.org/docs/hidden-services.html.en
- ↑ https://www.torproject.org/about/overview.html.en#thesolution
- ↑ https://en.wikipedia.org/wiki/.onion
- ↑ https://tor2web.org/
- ↑ http://domekit.cc/survival-kit-in-the-deep-web/
