Difference between revisions of "Installing linux"
From Gender and Tech Resources
m (→Debian) (Tag: VisualEditor) |
m (Tag: VisualEditor) |
||
| Line 46: | Line 46: | ||
=== Standard install with MATE === | === Standard install with MATE === | ||
| − | Boot from the USB, CD- or DVD-ROM and in the Isolinux bootloader menu choose install:[[File:Install.png|640px||thumb|center]]Choose language (this sets language for both the installation process as well as for the to-be-installed linux):[[File:Select-a-language.png|640px||thumb|center]]Select location. It doesn't have to be where you actually are. And you can change it later. It sets what repositories you use, but even that can be changed later.[[File:Select-location.png|640px||thumb|center]] | + | Boot from the USB, CD- or DVD-ROM and in the Isolinux bootloader menu choose install:[[File:Install.png|640px||thumb|center]]Choose language (this sets language for both the installation process as well as for the to-be-installed linux):[[File:Select-a-language.png|640px||thumb|center]]Select location. It doesn't have to be where you actually are. And you can change it later. It sets what repositories you use, but even that can be changed later.[[File:Select-location.png|640px||thumb|center]]Locales are used by glibc and other "locale-aware" programs or libraries for rendering text, correctly displaying regional monetary values, time and date formats, alphabetic idiosyncrasies, and other locale-specific standards:[[File:Configure-locales.png|640px||thumb|center]]The "American English" keyboard corresponds to the QWERTY layout, otherwise pick yours:[[File:Configure-keyboard.png|640px||thumb|center]]Until now the installation steps were completely contained in the boot image included on the CD, a file of limited size and loaded into memory by the BIOS when booting from the CD. What follows are a few automatic windows showing progress in |
| − | + | * detecting hardware: detects hardware and tries to identify the drive and loads the modules of the various hardware components detected, and then "mounts" the drive to read it | |
| − | [[File:Configure-locales.png|640px||thumb|center]] | + | * loading additional components: loads all the files necessary to continue including additional drivers for remaining hardware (especially the network card), as well as all the components of the installation program |
| − | + | * detecting network hardware: tries to identify the network card and load the associated firmware. If automatic detection fails, you can manually select the firmware to load, and you can do it later. If need be you can use a USB-network-adapter. If doing a <em>netinst</em> installation, this must be made to work now, because the debian packages must be loaded from the network. | |
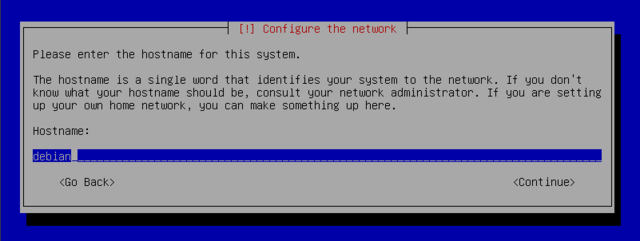
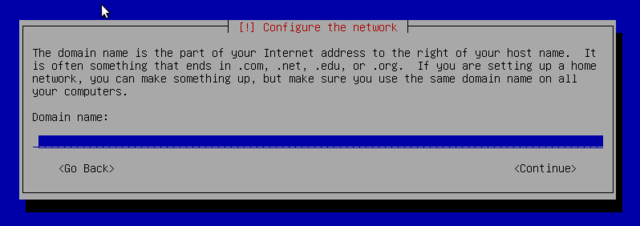
| − | [[File:Configure-keyboard.png|640px||thumb|center]] | + | Next the installer attempts an automatic network configuration by DHCP (for IPv4) and by IPv6 network discovery. If this fails, the installer provides choices: you can try again, attempt DHCP configuration by declaring the name of the machine (rumpelstiltskin jumps to mind), or set up a static network configuration. This requires having an IP address, a subnet mask, an IP address for a potential gateway, a machine name, and a domain name to enter.[[File:Configure-network.png|640px||thumb|center]] |
| − | + | ||
| − | [[File:Configure-network.png|640px||thumb|center]] | + | |
[[File:Configure-network2.png|640px||thumb|center]] | [[File:Configure-network2.png|640px||thumb|center]] | ||
== Installing a stripped debian (running *only* what you need) == | == Installing a stripped debian (running *only* what you need) == | ||
| + | At the first screen running the installer choose "Advanced Options" and then "expert" mode. Install now is "verbose" and details all possible options in the process of installation and allows for navigation between the various steps without them happening automatically in sequence. | ||
== Stealth install == | == Stealth install == | ||
== Making your own images == | == Making your own images == | ||
Revision as of 19:30, 18 June 2015
blabla
Contents
Shopping for a linux distro
Installation media
Unetbootin
DVD
Dual boot
You can have both windows and linux on your machine, each installed on a separate disk or partition, and choose which to start when booting. This configuration is called "dual boot", and the debian installation system can set it up during the hard drive partitioning stage of installation and setting up the bootloader.
Debian offers a windows program that will download and set up a 32 bit debian installer. You then only need to reboot the computer and choose between normal windows boot or booting the installation program. Let me know if still wurks (currently I have no machine with windows for testing it). You can find it here http://ftp.debian.org/debian/tools/win32-loader/stable/ and here http://goodbye-microsoft.com/.
Installing mint
Installing ubuntu
Debian
Download
Download for your preferred medium from https://www.debian.org/releases/jessie/debian-installer/
If you are confused about whether your kernel is 32 or 64 bits, in linux do:
$ uname -m
x86_64 means a 64-bit kernel and i686 means a 32-bit kernel. In windows try this https://support.microsoft.com/en-us/kb/827218
Note: you can install a 32-bit kernel on a 64-bit CPU. The fundamental difference between 32 and 64 bit systems is the size of memory addresses. In theory, a 32 bit system can not work with more than 4 GB of RAM (232 bytes). In practice, it is possible to work around this by using the 686-pae kernel, so long as the processor handles the PAE (Physical Address Extension). There is a performance price to pay for this, so if you are installing on a server with a huge amount of RAM, use the 64 bit kernel.
To learn more about your CPU in linux do:
$ cat /proc/cpuinfo
For windows you can type dxdiag in the run box.
Verify
Verify the md5 or sha256 checksum of the downloaded .iso file linux with:
$ md5sum debian-8.1.0-amd64-DVD-1.iso
or for example:
$ sha256sum debian-8.1.0-amd64-DVD-1.iso
and compare the output with key listed for debian-8.1.0-amd64-DVD-1.iso in respectively http://cdimage.debian.org/debian-cd/8.1.0/amd64/iso-dvd/MD5SUMS and http://cdimage.debian.org/debian-cd/8.1.0/amd64/iso-dvd/SHA256SUMS Other checksums are also given.
Windows does not come with md5sum. There are command line utilities (md5sum.exe) and the version available from Cygwin is probably easiest to install and update. Once installed, Cygwin's md5sum behaves exactly as the md5sum described for linux above.
Verify all dowloaded iso's.
Standard install with MATE
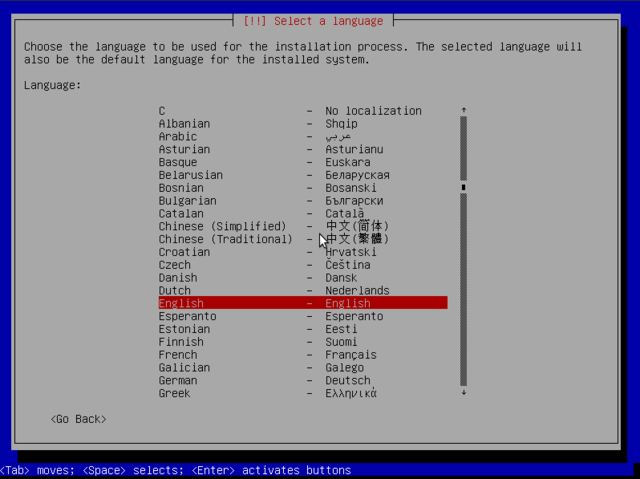
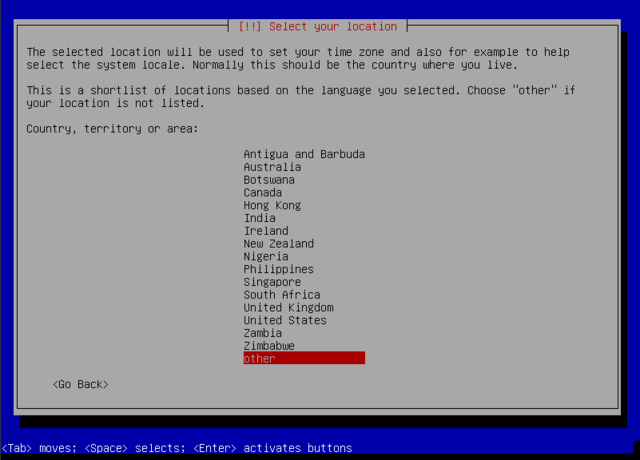
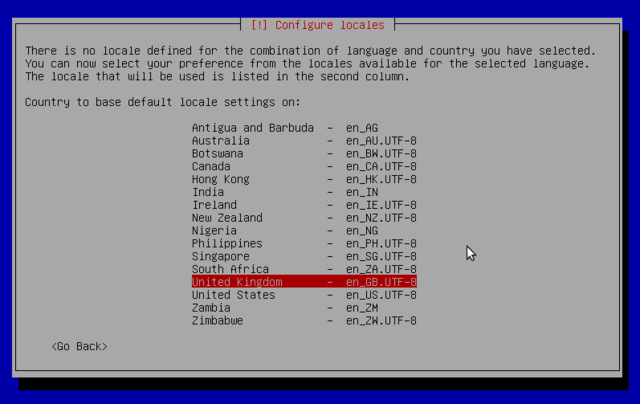
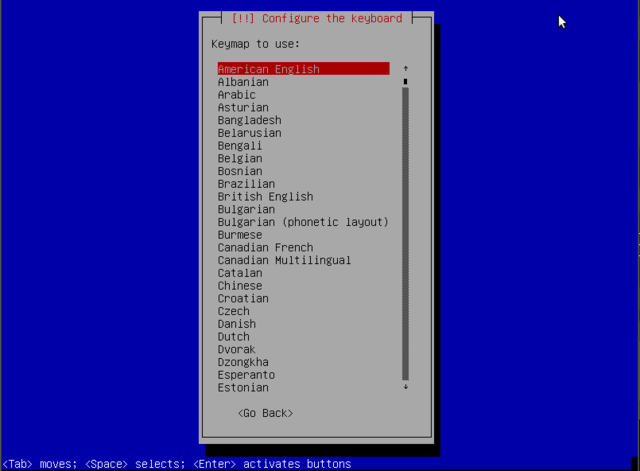
Boot from the USB, CD- or DVD-ROM and in the Isolinux bootloader menu choose install:Choose language (this sets language for both the installation process as well as for the to-be-installed linux):Select location. It doesn't have to be where you actually are. And you can change it later. It sets what repositories you use, but even that can be changed later.Locales are used by glibc and other "locale-aware" programs or libraries for rendering text, correctly displaying regional monetary values, time and date formats, alphabetic idiosyncrasies, and other locale-specific standards:The "American English" keyboard corresponds to the QWERTY layout, otherwise pick yours:Until now the installation steps were completely contained in the boot image included on the CD, a file of limited size and loaded into memory by the BIOS when booting from the CD. What follows are a few automatic windows showing progress in- detecting hardware: detects hardware and tries to identify the drive and loads the modules of the various hardware components detected, and then "mounts" the drive to read it
- loading additional components: loads all the files necessary to continue including additional drivers for remaining hardware (especially the network card), as well as all the components of the installation program
- detecting network hardware: tries to identify the network card and load the associated firmware. If automatic detection fails, you can manually select the firmware to load, and you can do it later. If need be you can use a USB-network-adapter. If doing a netinst installation, this must be made to work now, because the debian packages must be loaded from the network.
Installing a stripped debian (running *only* what you need)
At the first screen running the installer choose "Advanced Options" and then "expert" mode. Install now is "verbose" and details all possible options in the process of installation and allows for navigation between the various steps without them happening automatically in sequence.

